
Falling for Faux
by Kathryn Brenne
To see a list of all sewing tutorials, click here!

To read more about Kathryn’s handbag, see our leather tutorial! This version is made with stingray embossed cowhide, and has a bit more hardware and a side zip.
With my reputation as a leather expert, I was a little hesitant when Linda asked if I would consider writing an article about working with faux leather. I am guessing she was probably a bit reluctant to ask me but suggested she would put some samples in the mail to see what I thought. The samples arrived and they were wonderful! I fell in love with the white/gold faux leather. The color is beautiful, the fabric is very soft, and it has a slight texture to give it a ‘leather’ look. While working on the project, each of my three daughters admired the jacket and were surprised to find out that it wasn’t leather.
Thinking back to a pair of pleather jeans my oldest daughter wore to a high school dance many years ago, I remembered one of the drawbacks of some faux leather is that it does not breathe like real leather. I decided to combine the faux leather with a nubby textured sweater knit, which allows the jacket to breathe. Also, the combination of fabric and faux leather makes the faux seem more ‘real’.
Many of the techniques I use for sewing with leather also apply to vinyl or faux leather fabrics. Working with faux leather allows you the opportunity to try these techniques at a fraction of the cost. Once you gain confidence in working with faux, perhaps you will want to try your hand at sewing with real leather.

The Fabric
Faux leather is ideal for accessories and trims as well as garments. Because it can be
purchased by the yard rather than by the skin, it is possible to cut large or long pieces from a length of fabric. Consider using faux for the front of pants or leggings, the front or panels of a sweater or top, a straight skirt, handbags or for accents for a fabric project. It combines beautifully with sweater and ponte knits. It is also the perfect solution for people who do not wear leather. Faux leather will not wear quite as well as real leather and like real leather it scratches easily, so you might want to consider this before placing it in areas of high stress such as elbows or the seat of pants.
The Pattern
I chose Butterick B6169 because its smaller pattern pieces allowed me to replace some of the garment sections with faux leather to give it the look of a real leather garment.
For my jacket I cut the Front, Front Facing, Side Front, Back Neck Facing, Welt Pocket and
Upper Sleeve from the faux leather. The remainder of the garment sections were cut from the sweater knit. The pocket bags and lining were cut from stretch silk charmeuse in EOS fabric #41032 color # 127. The stretch silk charmeuse added a touch of
luxury and was the perfect complement to the sweater knit, which has some stretch.
Fabric Prep
Faux leather can be carefully pressed from the wrong side with a warm iron. Always test on a scrap first. Too much heat can damage the synthetic fiber. To remove any creases or wrinkles from the fabric press the wrong side of the fabric or put the fabric in the dryer for a few minutes with some damp towels to soften. Remove from the dryer and hang. You will be surprised at how quickly the wrinkles disappear!
To preshrink the sweater knit I steamed it with a damp press cloth and hung it to dry.
Layout and Cutting
The sweater knit had a predominant crosswise stripe, which appeared to be crooked and angled down off grain. This can happen with some knits, which are knit in a tube and then cut to create a selvedge edge. Instead of aligning the pattern pieces with the lengthwise grain, I added a crosswise grain line at 90 degrees to the marked grain line and used this to place the pattern pieces on the crosswise stripe. Once assembled the stripes appeared to be straight across the garment.

Always cut faux leather with the right side facing up, and as a single layer. Instead of using pins, which leave holes or marks in the faux leather, use weights. To cut both fabrics use a rotary cutter for more accurate results.
Notions
A beautiful Riri satin tape separating zipper was the perfect complement to the white/gold faux leather.
Wonder Clips are used instead of pins to hold layers together.
Double sided Wonder Tape is used to hold seam allowances flat.
100% Polyester all purpose sewing thread is suitable for both the knit and faux leather fabrics.
A Universal size 70 needle was used for all machine stitching. It left the smallest hole possible in this weight of faux leather.
Interfacing
A fusible interfacing can be used with faux leather but be careful to use one that fuses quickly and at a lower temperature. We used a featherweight fusible EOS #16512 which added a bit of stability to the faux leather and prevented the seam allowances from showing through. Interfacing was use on the Fronts, Front Facings, Back Neck Facing, pocket Welts and hem allowances. Cut 2″ wide strips on the cross grain to use for the hem interfacings.

Machine Set Up
Use the smallest Universal needle possible for sewing the faux leather. A Universal needle will pierce the vinyl without making a large hole. As mentioned, I used a size 70 needle for all of the construction.
A Teflon presser foot was used to prevent the faux leather from sticking to the presser foot. I used a machine that has a built in walking foot. This helps the fabric to feed evenly.
Techniques
For sewing knit pieces to knit pieces I used a slight zig zag with a stitch width of .5 mm and a stitch length of 2.5 mm. A straight stitch with a stitch length of 3 mm was used to sew the faux leather to other faux leather or knit pieces. Too short a stitch length creates too many holes close together, which could weaken the faux leather. For topstitching I used a straight stitch with a length of 3.5 mm.
Zipper insertion
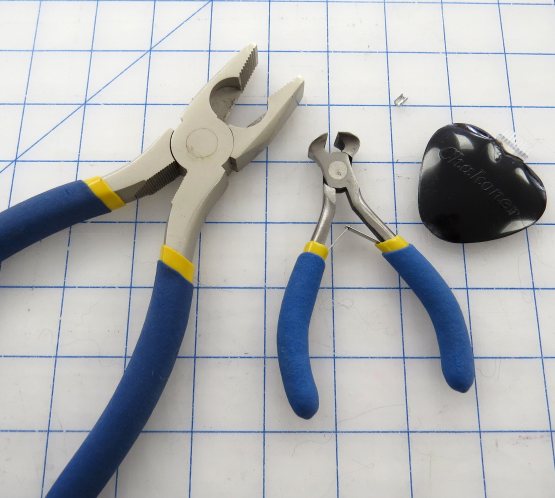
The zipper was too long so I shortened it myself using a pair of side cutters and pliers.
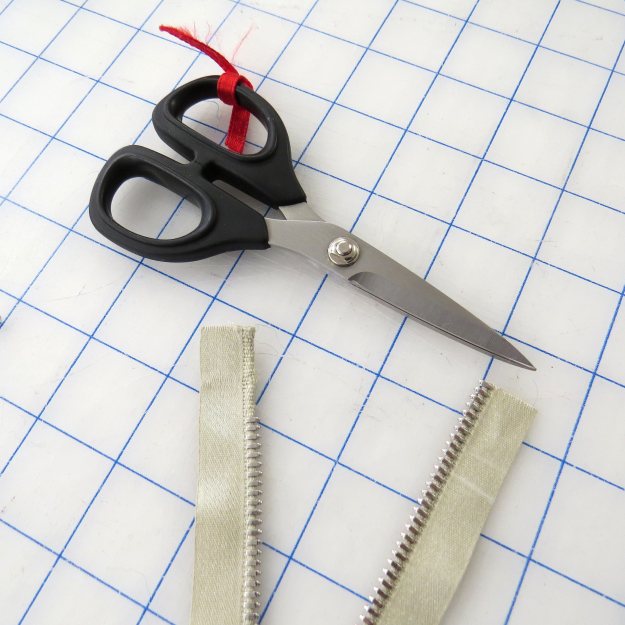
To shorten a zipper, mark the correct length with chalk on the zipper tape.


Cut off the excess length 1 1/4″ above the chalk mark.

Use the side cutters to carefully open up the zipper stoppers at the end of the original zipper. Be careful not to open them up too much or they will break in half. Open each stopper just enough to remove it from the zipper tape.

Practice removing zipper teeth from the excess tape. Grab a tooth with the pliers and using a twist and pull motion remove the teeth one at a time. If the teeth are difficult to remove or the zipper tape is becoming damaged, use the side cutters to cut the teeth away, avoiding the zipper tape.


Once the teeth have been removed from the zipper tape, position the zipper stoppers close to the last teeth. Use the pliers to tighten the stoppers.


Pink the end of the tape to prevent it from fraying.

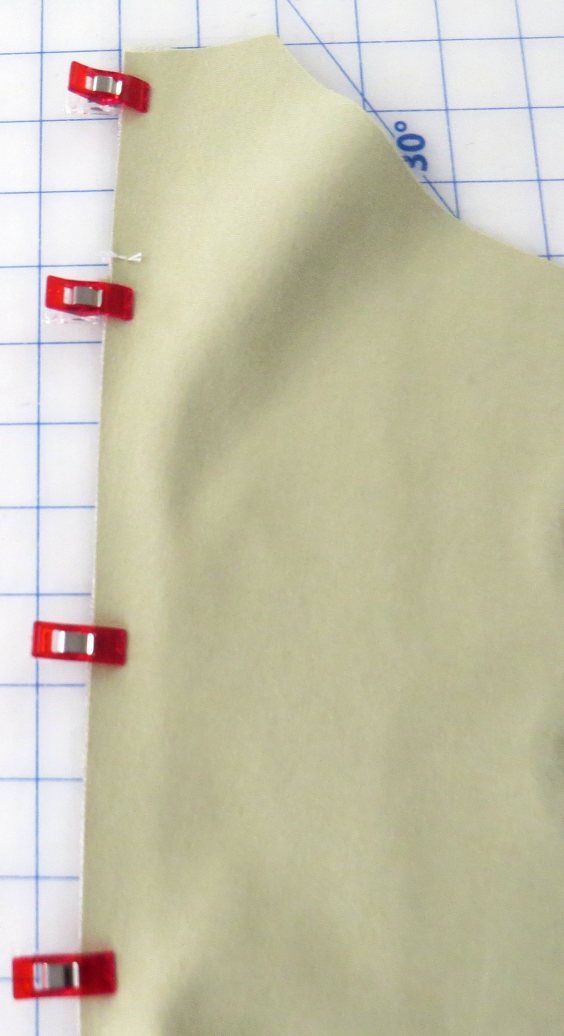
Instead of using pins, which would leave holes in the faux leather I used double sided Wonder Tape and Wonder Clips. These handy clips held layers together in place of pins.

Tape the zipper to the middle Front.


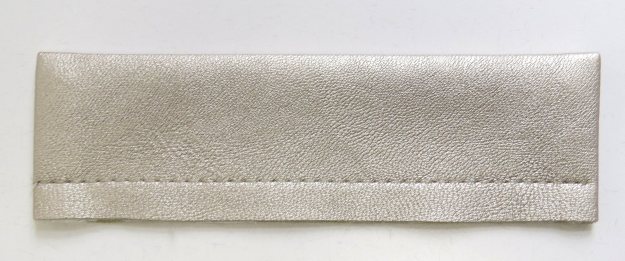
Fold in the top corners of the zipper tape to conceal the raw edge. Machine baste to hold the zipper in place.

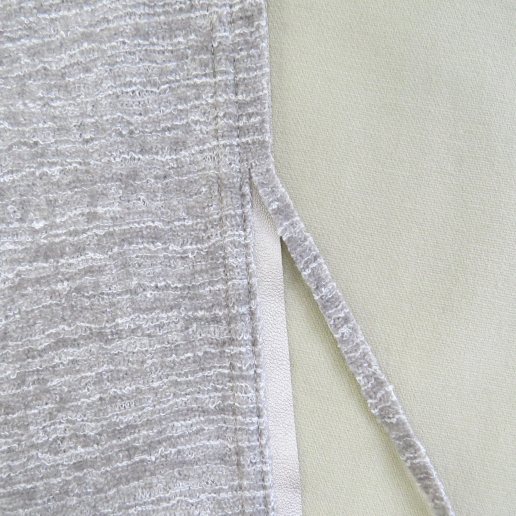
The Side Front panel is clipped to the Front panel, sandwiching the zipper between the two.
The other side of the zipper is sandwiched between the opposite Front and Front Facing panels.

Leave enough room between the seam and the zipper teeth to allow the zipper pull to move smoothly up and down.
Welt Pockets
The welt pockets were inserted as per the pattern instructions. After sewing the ends of the welts, I used Wonder Tape to hold the edges together while I machine basted them.


I pinked the edges of the pocket bags to soften them.

The welts were inserted into the middle Front seam allowance. I left long threads from the topstitching, pulled these through and tied them off underneath to avoid too much backstitching in the faux leather.


Finishing the Neck and Front Edges
After attaching the Front and Back Neck Facings to the jacket, clip into the neck edge seam allowance about 3/8”. Clipping on an angle and not all the way to the stitching line will help to create a smooth neckline.

Clip corners on an angle.

Use a point turner to poke out corners and smooth seam allowances in the corner area.
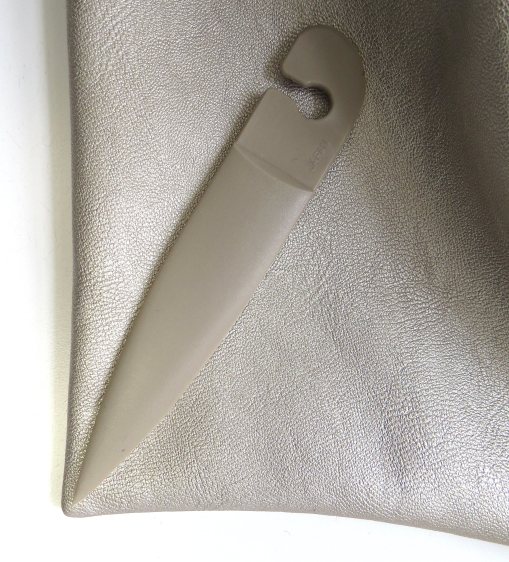
Corners can be lightly hammered with a rubber mallet.

Find where the break point is on the front edge of the jacket. If the jacket were to be worn open the break point is where the collar begins to roll. Trim seam allowances along the Front edges, grading seams and reversing the grade at the break point. On a graded seam allowance, the longer trimmed seam allowance edge is always against the public side of the garment. Along the Front edge of the jacket the longest edge will change right at the break point. In other words, below the break point the Facing side of the garment will be the shorter seam allowance, while above the break point the Facing side of the garment will be the longer seam allowance.

Topstitching
Topstitching will help keep all seams laying flat. Tape the seams with Wonder Tape to prevent the top layer from shifting.
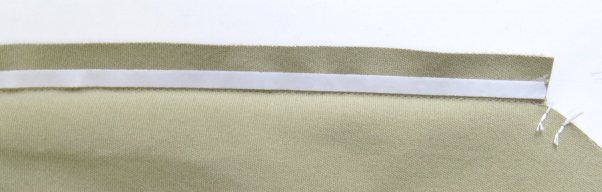

The faux leather may drag a bit under the sewing foot. To prevent this from happening, stop periodically, lift the presser foot and smooth the work out.
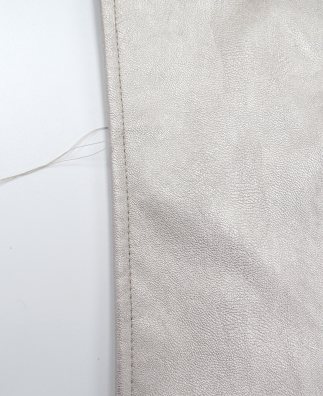
After topstitching a seam, grade the seam by trimming back the knit seam allowance close to the stitching and trimming the faux leather seam allowance to just a touch longer than the knit.

Topstitch Front edges and around the Back neck.

Stop at the corners and leave long thread tails. Tie off threads and pull them between the layers. This creates very clean, square corners in the topstitching.

The best stitch quality always occurs with the right side of the fabric facing up. At the break point the right side of the garment changes from being the Jacket Front to being the Front Facing, so stitch up to the break point, leave long thread tails, flip the
garment over and stitch from the break point to the shoulder. Then turn the garment back over and stitch around the back of the neck to the other shoulder. The long thread tails are knotted off and buried between the layers of fabric.

Pressing
Press with a dry iron and press cloth to protect the faux leather. If the faux leather is pressed too much it can start to lose its textured surface. Taping the seams (as mentioned above) to help keep them laying flat minimized the amount of pressing needed. Corners can be lightly hammered flat with a rubber mallet. Position
the corner to be hammered on a wooden board covered with a piece of flannelette. The
flannelette will protect the faux leather. Place a press cloth over the fabric before hammering.

Setting in the Sleeve
Leather and faux leather do not ease well. It maybe necessary to either reduce the amount of ease in the sleeve cap or distribute some of the ease lower on the cap. B6169 did not have an excessive amount of ease so this adjustment was unnecessary, but be mindful of this in choosing a pattern.
Place two rows of basting stitches around the sleeve cap from notch to notch. The stitch length for the basting can be 3.8 mm. Pull up the basting and distribute some of the fullness into the fabric portion of the sleeve if needed. The wool sweater knit will
absorb the ease without a problem. Use Wonder Clips to ‘pin’ the sleeve into the armhole.


Baste the sleeve in using a 1/2″ seam allowance. By using a narrower seam allowance, you will have the opportunity to see how the sleeve fits into the armhole and adjust it if necessary without leaving holes.

Once the sleeve has been set into position and you are happy with the results, sew using a 5/8″ seam allowance.
Adding Shoulder Pads and Sleeve Heads
Sleeve heads will help to fill out the faux leather and prevent it from dimpling along the sleeve cap. Position the sleeve heads along the stitching line and hand sew in place as described here.

The shoulder pads can be sewn to the shoulder seam allowances with a running stitch.

Inserting the Lining
Assemble the body of the lining. Once the jacket is complete, the lining can be sewn to the Front and Back Neck Facings. Put the garment on a dress stand inside out. Pin the lining to the armhole.

Use a long running stitch to baste the layers together around the armhole. I like to hand sew the sleeve lining to the armhole, which holds it securely in place. For more complete instructions regarding sleeve insertion, click here.
Hemming
One of the bonuses of working with faux leather is it is easier to hand sew as compared with real leather, due to its knit backing. To hem the jacket and sleeves I used a hem
stitch. Sew through the hem allowance and pick up just a bit of the knit backing. Be careful not to go too deep or the stitches will show on the right side of the fabric.


Jeans
I styled the jacket with another pair of my favorite jeans. To add a bit of glitz to coordinate with the white/gold faux leather I added heat set crystals to the back pockets. The crystals came as a strip, which I cut apart and applied with the iron.


Faux Leather Belt

From some of the leftover faux leather I made a belt to wear with the jeans. Cut a piece of belting slightly narrower than the finished width of the belt. The belting needs to
be narrower to comfortably accommodate the thickness of the faux leather once the belting is covered. Try a sample first to determine how wide the belting needs to be and how wide to cut the faux leather in order to wrap it completely around the belting and meet in the center on the wrong side of the belt. Round one end of the belting. Apply rubber cement to the wrong side of the faux leather.
Position the belting down the center of the faux leather. Neatly fold the faux leather over the rounded end of the belt.

Fold the long edges of the belt in towards the center.
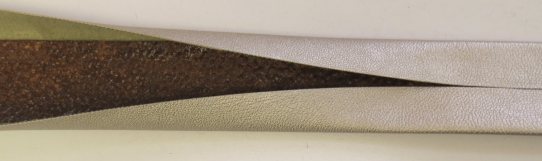
Miter the corners of the faux leather were they meet the rounded edge of the belt.
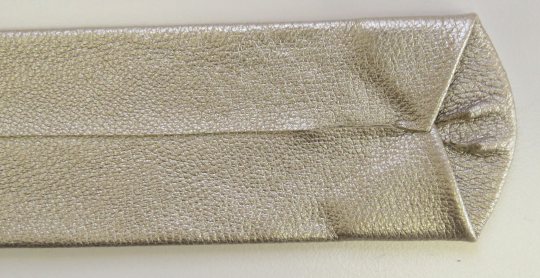
Cut a piece of faux leather wider than the finished belt. Use rubber cement to glue this to the wrong side of the belt.

Topstitch around the belt. Trim away the excess fabric from the back of the belt using appliqué scissors.


Use a hole punch to make a hole for the belt buckle. Mark your waist measurement plus 1” of wearing ease as the center hole for the belt. Mark a hole on either side of the center hole. Punch these holes with a hole punch.

Combined with a white T-shirt this outfit can take me from lunch to an evening out in comfort and style!


I’m trying to narrow a pleather pencil skirt but the fabric squirms and shifts creating pretty much all the possible faults in a straight seam. I feel like “stop me before I kill again”, yet It should be possible.
LikeLike
I suggest using lots of the red clips that Kathryn shows in this article to hold everything in place. You can also hand baste the seam before sewing and that will keep everything in place. Also, check to make sure you are using a sharp needle of the correct size on your sewing machine, and test the stitching first on a scrap.
LikeLike
Incredible work, fantastic tips thank you
LikeLiked by 1 person
Thank you so much for sharing all of your tips about sewing on the faux leather. I especially am interested in the belt that you made. It is gorgeous and so perfect with your pants!
LikeLike
Beautiful! I’m inspired. Gotta get that jacket pattern.
LikeLike
Beautiful and inspiring! I’ve been looking at faux leather but hesitated because of the lack of “breathability,” What a stunning solution you’ve achieved with your combination of faux leather and fabric! Thank you for all of the helpful tips, too!
LikeLike
Could you also share with us where you get your heat set crystals? Wonderful addition to those jeans!
LikeLike
Thank You Kathryn.
LikeLike
Thanks for putting together such an outstanding tutorial. All of it, the fabrics, the details, the photos, the styling. I am beyond impressed. What a great partnership between you and EOS. Just fantastic.
LikeLike
Looks phenomenal Katherine! I bought that same faux leather in the metallic blue/gray color. You’ve inspired me to forge ahead with that project! Thank you!!!
LikeLike
Riri zippers are available from http://www.pacifictrimming.com
LikeLike
Would You share with Us , where did You get this cute riri zipper?
LikeLike
Wow. Your work is always fabulous and this is no acception. I have this pattern maybe I’ll combine the black leather I have, which isn’t enough for a jacket with some wool sweater knit. Very nice.
LikeLike
Really gorgeous work! Linking this on my Facebook site (The Vegan Tailor).
LikeLike
Wow. I’m inspired to try this.
LikeLike