Inspiration No. 25: Inspired by Balenciaga

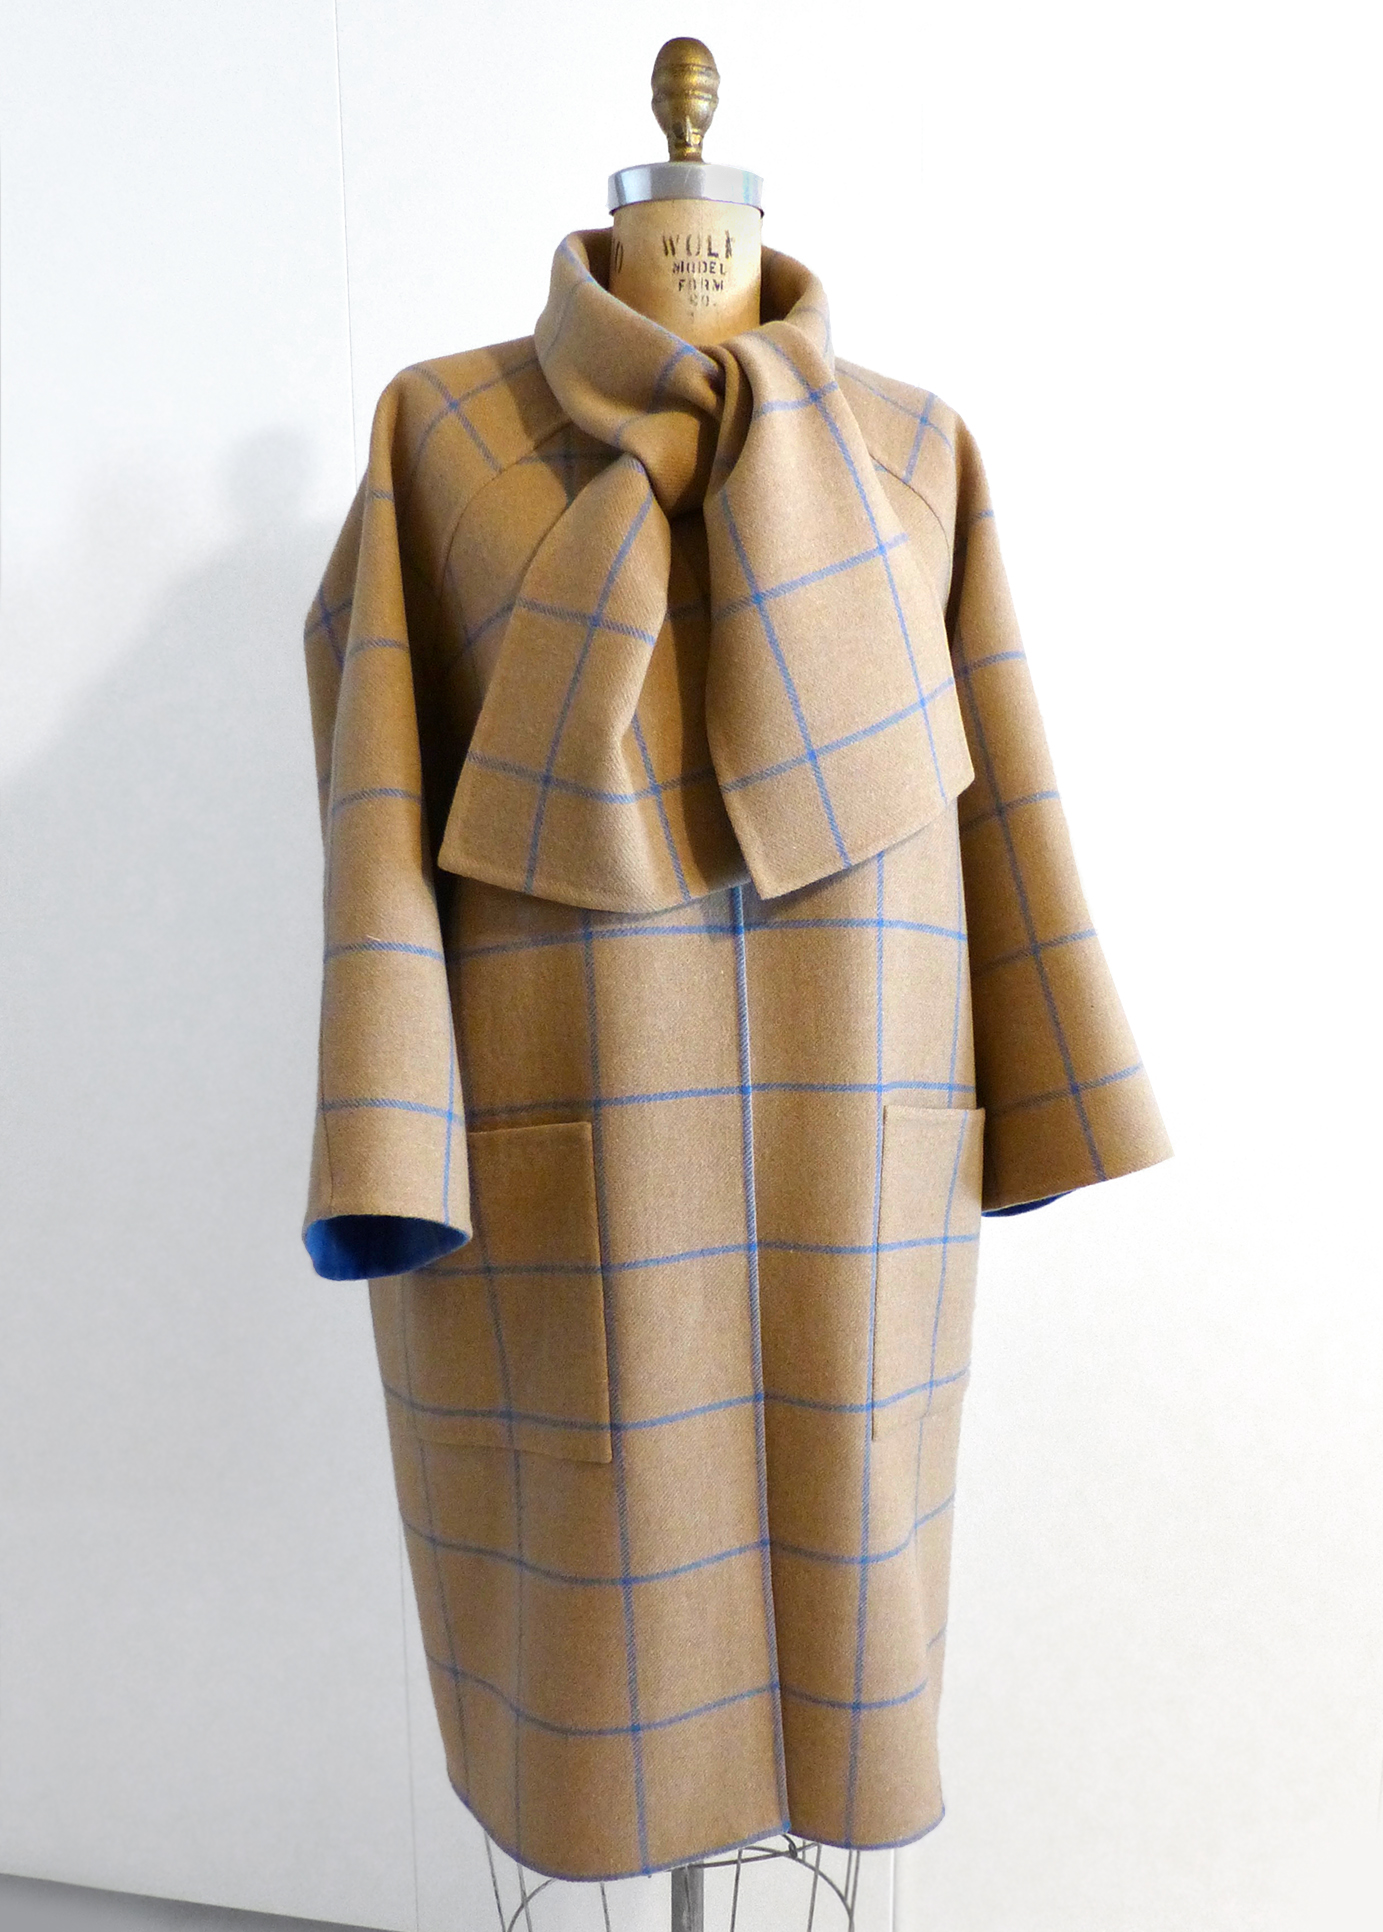
A Reversible Double Cloth Coat With Matching Scarf

by Kathryn Brenne

Almost 50 years after his death, Spanish fashion designer Cristobal Balenciaga still holds the title “the King of Fashion”. Balenciaga’s designs were structured and architectural in their shape, and they set the standard amongst his contemporaries as well as top designers who followed. He was known and greatly admired for his tailoring skills and Haute Couture techniques. His sparse designs still look as interesting, fresh and current today as they did during the 1950’s and ’60’s.

Cristobal Balenciaga, 1950

In 2017, I attended the Shaping Fashion exhibition at the Victoria and Albert Museum in London, England. The exhibition examined the work and legacy of Balenciaga’s work. At the exhibition a small printed pattern of Balenciaga’s one seam coat cut from a single piece of cloth was provided. Attendees were encouraged to try cutting and folding it to better understand how it was designed and constructed. The exhibit also featured a well known photo of fashion editor Diana Vreeland preparing to exhibit the 1961 design at a Balenciaga retrospective held at the Metropolitan Museum of Art in 1973, one year after the designer’s death.

Diana Vreeland, preparing the one-seam coat for the exhibition

Balenciaga had a penchant for checks and often used them in his designs. The coat was cut from double cloth. Its shape was created with folds, a few seams and darts. When I spotted a windowpane reversible check at emmaonesock.com I knew it would be the perfect fabric to make up the coat!

Fabric: Double Cloth vs Double Face

There is often confusion with the terms double cloth and double face fabrics. Both are made from two layers, often with different colors or patterns. Double face fabrics cannot be separated or pulled apart whereas double cloth fabrics are held together by a set of threads. It is these threads which can be carefully clipped to separate the layers and create almost invisible seams in a reversible unlined garment.

The windowpane check I chose is a double cloth fabric, so the techniques discussed in this tutorial relate to this type of fabric. Double cloth requires a different method of assembling a garment and involves a lot of hand sewing. The fabric that was used is now sold out, but any coating fabric can be used!

If you do not like hand sewing or would prefer to use a different fabric that is not double cloth, the garment can still be made using the same pattern with the addition of a lining to cover traditional seams, darts and hems. Some of the techniques could be modified slightly for non-raveling fabrics such as boiled wool or fleece to create a casual modern version of the design. To see our complete collection of coating fabrics CLICK HERE!

Any type of coating fabric for any season can be used for this project. Enjoy these mock-ups showing a range of choices.

For this design I used 1.88 yards of fabric. This was just enough for the coat, pockets and a separate scarf. To prepare the fabric I damp pressed the wool blend and hung it to dry.

Double cloth fabrics are held together with a set of threads. On this particular fabric the thread used was a white, woolly nylon. Often the thread is a matching fiber and color.

The Pattern

The simple double-sided pattern from the V&A exhibition is cut from a single piece of fabric. It is shaped with two long darts in the back and two darts in the center of the sleeves. There are two cut lines. Once cut these two pieces of cloth fold around to form the lower Fronts of the coat. The sleeves fold along the shoulder to form both the Sleeves and the Upper Fronts.

Most wool coating fabrics are 55″ – 60″ wide. The width of the fabric becomes the width of the coat and will accommodate bust and hip measurements up to this width. The sleeves are quite wide and will accommodate all sizes. The sleeve length is determined by the width of the fabric. I am 5’8″ tall and was able to get long sleeves out of my 58.5″ wide fabric.

It is such an ingenious design, as it fits a wide range of figures and uses a minimal amount of cloth with almost zero waste!

Try printing out this pattern to get a sense of Balenciaga’s design. Fold and tape the pattern together to see the coat taking shape. Click the button below for a print-friendly file.

After researching the design I came across this copy of Balenciaga’s pattern. It has the addition of a Front Yoke inserted as a gusset into the Front. This provides some shaping and pitches the sleeve slightly forward.

Try printing this design and taping it together with the addition of the Front Gusset to see how the shape changes.

I decided to use the more detailed pattern. I enlarged the pattern to the width of my fabric and test-fit it in muslin. I then used the muslin as my pattern. I drew out the windowpane check, which has a 3.75″ repeat, onto half of the muslin to best position the pattern on the cloth and keep everything on grain.

My muslin pattern measures 50.5” in length and 52” wide. If you were lucky to purchase the fabric that I used for this tutorial, you can draw 3 3/4” squares onto a piece of paper or muslin and then just count the squares as you see in the photos here. It doesn’t need to be precise to get the shape. The coat can be made longer or shorter, narrower or as wide as the fabric will accommodate, it could have a center back seam for narrower fabrics.

Making the muslin pattern may take some tweaking to get it the way you want it, but it does not take a lot of skill to make the coat once your pattern is worked out. It is all straight lines!

Whether you choose the simple or the more detailed pattern design, the techniques will be the same, and the result will be elegant and timeless!

Layout and Marking

The best way to mark the pattern onto the fabric is to use thread tracing. Thread tracing is a technique which uses cotton tacking thread to outline the stitching line of a garment onto fabric.

On a single layer of cloth I found the center of the fabric and aligned CB of the muslin along the middle of the checked line. I positioned the pattern so that the hem would fall at the edge of a check. I allowed an extra inch, which is where the fabric had been cut, to finish the hem.

In this layout there was enough fabric to cut the coat, Front Yokes, 2 pockets and a 10″ wide crosswise scarf. The muslin is aligned at CB along a blue check.

To thread trace, pin the pattern to the fabric, placing pins every three to four inches along the stitching lines. Mark all darts, seams and markings for sleeve, pockets, side seams and CB with pins. Turn the fabric over. The outline of the coat will be marked with pins. Use cotton tacking thread and a long darner needle to carefully outline the design with 1/2″ long stitches. Only pick up one layer of cloth. Do not stitch through to the other side or you will not be able to separate the layers later.

Half of the coat has been tacked out on a single layer of fabric. From this photo you can use the checks to help enlarge the pattern to draft your own version to scale. The checks on this fabric are 3 3/4″ square.

After half of the coat is tacked out, remove the pattern and fold the fabric in half along the Center Back. I found it helpful to pin the corners of some of the checks together to ensure the two layers were exactly on top of each other. Using the tacked outline as a guide, pin through to the unmarked side, again placing pins every three to four inches, marking all darts, seams, etc. Again, turn the fabric over, and using the pins as a guide, thread trace the outline of the other half of the coat using tacking thread. You will end up with two identical halves.

Now that one side of the fabric is marked out fully, lay the fabric out in a single layer again. Pin through the tack markings to outline the coat onto the opposite side of the fabric. Thread trace the outline onto the second side. Although this seems like a lot of work it is worth the effort! It is very helpful to have both sides of the fabric completely marked with tacking thread when assembling the coat.

Once all of the thread tracing is complete the pattern will be marked on both sides of the fabric.

Separating the Layers: A Few Tips!

Be prudent! Take care when separating the layers. Separating too much fabric will leave wide seam allowances where you will see that the fabrics are not joined together. It is better to go slowly and separate a bit more fabric later, if needed, rather than open too much to start with.

Be cautious! Use a small pair of scissors to clip the threads when separating the layers. Do not accidentally clip a hole in one of the layers of fabric.

Be gentle! Once the Front seam has been cut, handle the garment gently and with care. The tips of the darts and the end of the Front cut lines are very narrow and potentially weak areas that could fray easily if not handled carefully. Once they are hand over-sewn and machine-stitched they are fine.

Before beginning construction of the coat, I cut a 3″ square of fabric to test out the technique of creating a seam. Find a piece to test after your coat has been thread traced, as this is an almost zero waste pattern and you don’t want to accidentally cut out a sample in the wrong place.

I decided to do all of the machine sewing on the tan side of the fabric and the hand finishing on the blue side. The pockets were placed on the tan side. I found that the heathery appearance on the blue side hid the shadow of the pockets, seams and darts better than the tan side. These are the kinds of judgements you will need to make, depending on your fabric choice.

Construction Techniques

The construction of this garment is very different from a regular garment. It is more akin to origami, a work in progress, made from a single piece of fabric. There are no traditional pattern pieces to cut out and seam together. Working with the garment as a whole piece of fabric, it is shaped with darts, folds and a few seams. The process is a bit like origami. The tack lines are actual stitching lines. There are no seam allowances as you would find in a commercial pattern.

In the following sections I will outline the construction techniques used to sew seams, darts and edge finishes. These same techniques are used throughout the garment construction. Once you familiarize yourself with and practice the construction techniques, you can proceed to the Sequence of Construction section of this article, which will be helpful in assembling the garment.

Edges and Hems

With regular garment construction, seams are usually sewn first and edges finished last. With double cloth construction, edges and hems are finished as you assemble the garment. In fact, the first step is to hem the back of this garment!

When separating layers of fabric leave a generous 1/2″ of fabric outside of the tack line. This will be cut down to 1/4″ but the process of separating the layers can stretch and distort the edge. I prefer to leave a bit extra, which can be pressed flat and then trimmed down to the appropriate width after it has been separated.

I discovered that the threads joining the two layers together on this particular cloth are quite strong and run lengthwise. For lengthwise edges that need to be separated such as the Fronts, I was able to pull the threads out leaving a nice clean edge. For crosswise edges I gently pulled the layers apart and used a small pair of scissors to open up the edge. Again, this will vary with your fabric choice.

To begin place a row of pins 1/4″ inside the finished garment tack line. The row of pins prevents you from opening up too much of the edge.

Place a row of pins 1/4″ back from the finished edge.

Pull the layers apart until the row of pins is reached. If scissors were used to clip the threads remove loose threads as they will work their way through the cloth. I found a lint brush handy for this job. Don’t be too aggressive with the lint brush or you will risk unravelling your fabric!

Press the edge flat. Trim to 1/4″. Fold one layer to the inside. Work with the good side of the fabric facing up and use your eye as a guide along with the tack thread to fold a straight line. Press. Turn the garment over and do the same on the reverse side. The two edges should just meet along the tack lines. If the edge follows a solid check, the edge of the check can be used rather than the tack line.

Use a slip stitch to close the edge. Stitches should be small and invisible. The thread can be tensioned to tighten up the edge slightly if it has stretched.

Use a slipstitch to close the edge.

During the construction process, finished edges are often inserted into an unfinished edge when a dart or seam is sewn. When finishing the second edge leave a little bit of extra fabric to wrap over the previously finished edge. A slightly wider 1/4″ is sufficient. Neatly fold one of the raw edges over the finished edge. An awl or the end of a seam ripper is useful for tucking the edge in. Fold the opposite edge in to meet. The meeting point of all edges should be tight. Make the stitches small and tight to keep the edge straight. You do not want the finished edge to have a lump in it.

Darts

There are four darts in this garment, which give the sleeves and body their shape. You separate one side of the dart but leave the other side intact. I sewed the darts by inserting the intact side of the dart (not separated), into the side that was separated. The dart was machine sewn on one side of the fabric and finished by hand on the reverse side.

Begin by cutting down the center of the dart to the tip. Very gently separate a small amount of fabric at the tip of the dart on the side that needs to be opened. Remember, the tip of the dart is very narrow and only a wide 1/8″ will need to be opened up. Opening up too much leaves loose cloth that will show on the finished dart. Immediately hand over-sew the tip of all three layers (the two separated layers and the other intact double layer) for 1 1/2″ – 2″ to prevent the fabric from unravelling. Stitches should be deep enough to catch at least two threads of the fabric. Use a thread color that will blend with the fabric as these stitches are permanent. It is important that the over-sewing is done before the garment is picked up or handled. In the close up photo below you can see that I have over-sewn by hand to the tack line. My stitches are close together and continue until the dart starts to widen.

Pin the non separated edge to one layer (I used the the tan layer) of the separated edge, aligning the tack lines. Match checks so that they line up across the garment. Place a pin at the tip of the dart to hold the other separated layer out of the way. With a contrasting thread baste the dart together. Take a temporary stitch on each side of a check to prevent the fabric from shifting when it is machine sewn. A pin at each check can also help to prevent shifting. Carefully take the entire cloth over to the machine, and machine stitch the dart. Shorten the stitch length to 2.3 mm for 2″-3″ at the tip to reinforce the narrow edge. Leave long thread tails at the tip and use these to hand over-sew the tip as further reinforcement.

Press the dart flat to set the stitches. Working over a seam roll, press the sewn edges open trying to keep the one unsewn separated layer out of the way. Press the dart towards the separated layers.

Trim the single layer (tan) edge to 1/4″. Grade the double layer to a narrow 1/4″. Trim the reverse single layer (blue), which will cover the dart to a wide 1/4″. This layer needs to be slightly wider to go over the other layers and cover the line of stitching. Tuck the edge under and pin, lining up any checks. At the tip of the dart there is only a narrow bit, which was previously over-sewn, to tuck in. Slip stitch the edge closed. Use the tip of your needle to turn in the tip of the dart before stitching it closed. Use small, short stitches to reinforce the tip.

Once the reverse side has been closed up, press the finished dart over a wooden seam stick. Cover the fabric with a press cloth and apply a bit of moisture. This technique will flatten out the bulk helping to make the darts invisible.

Seams

There are only a few seams in this garment depending on which pattern you choose. Both patterns have an underarm sleeve seam and a seam across the Front. The more detailed pattern has the addition of a Yoke and this adds a seam at the sleeve as well as the upper edge where the Yoke joins to the shoulder.

There are different methods of constructing seams in double cloth. For this garment I chose insertion seams. This type of seam reduces the amount of separating that needs to be done and gives nice narrow seams that are almost invisible once complete. Like the darts, the seams are done by inserting a double layer of fabric into separated layers of fabric.

One of the most critical seams is the Front seam that attaches to the Front Yoke or Upper Front. This seam should be as invisible as possible. I kept the separating and the seam very narrow, just the width of the blue check line.

I placed the lower Front seam right along the edge of a check. The point where the sleeve and lower Front get cut apart resembles a dart. As this is a point of high stress, located at the underarm of the finished garment, I left a slightly wider seam allowance of a narrow 1/4″ on the lower Front and cut the Sleeve a bit narrower. Over-sew the narrow bit of the Sleeve.

Gently separate the layers of the lower Front. Keep this as narrow as possible. If the seam can just fill the check it will be most invisible. If the layers are separated beyond the check, it will show. When joining the Front Yoke to the lower Front I basted the two layers together just a thread back from the edge of the check. Using my built in dual feed walking foot I sewed right along the edge of the check. To prevent the vertical checks from shifting, I put a pin into the front edge of each check.

Baste one thread back from the edge of the check. Place a pin aligning at the front edge of vertical checks.

After the seam is machine stitched, press and finish as described with the darts. When closing the reverse side, I left a bit unfinished at the Yoke/Sleeve edge. This allowed me to get in and sew the other seams before returning and finishing up the corner.

Once complete the Front seam is almost invisible.

Front seam attaches to the Front Yoke on the third horizontal check down from the neck edge. It should be almost invisible.

Stay Tapes

The edges of the Front Yoke, Lower Front and neck require stay tapes to prevent them from stretching. The stay tape should be thin and narrow. As the edges are only turned in on themselves by 1/4″, stay tape that is too wide would create extra bulk when folded back on itself.

I used the selvedge from a piece of silk in a color that blended with the coat. It was cut 1/4″ wide, which is narrower than regular stay tapes but perfect for these edges. Pin the stay tape in place with the woven edge of the selvedge facing in towards the garment. The tape should be centered over the tack line, which is the fold line. Use a stab stitch, working from the right side of the cloth, to stitch the tape in place. Stitches should be approximately 3/8″ long.

Once the stay tape is inserted the edge can be folded in and finished by hand.

Pressing Equipment

Some of the pressing tools I used were:

  • Tailor’s Ham to lift my work up when I was hand sewing.
  • A batiste press cloth to protect the fabric when pressing.
  • A fine mist water bottle to apply moisture to the press cloth when needed.
  • Seam Roll for pressing seams and darts open.
  • A wooden seam stick to get a flat press after the reverse side of seams and darts had been hand sewn.
  • Wooden block for pressing very flat edges.
  • A long metal ruler to give a straight edge to press up against when pressing the coat Fronts.

Sequence of Construction

The construction of this coat goes together differently than a regularly sewn garment. Some edges are finished before darts or seams are sewn. I have outlined the sequence I used, which worked well.

  • Cut the Back darts.  Carefully separate the side Back layers only at the tip. Over-sew all edges at the tip of the dart for 1 1/2” – 2”. Once the tip is over-sewn, the remainder of the side Back edge can be separated.
  • Hem the Back between the two darts beginning and ending just 1/8” beyond the tack line.
  • Sew Back darts inserting CB into the separated side Back. Finish the reverse side by hand.
  • Hem side Back and Fronts ending 1/4” back from CF. 
  • Cut lower Front and Back Sleeve apart. Carefully separate the lower Front layers at the side seam. Over-sew the separated layers of the Front and the Sleeve for a few inches.
  • Cut the Sleeve dart. Separate the Back Sleeve layers at the tip and oversew. Over-sew the Front Sleeve dart tip.
Individual separated layers as well as the double layer are oversewn by hand.
  • Hem the Front Sleeve beginning an inch back from the underarm seam. This will allow you to sew and finish the Sleeve seam and then finish this bit of hem when the seam is finished by hand.
  • Sew the Sleeve dart, inserting the Front Sleeve into the separated layers of the Back Sleeve. Finish the reverse side by hand.
  • Hem the Back Sleeve.
  • Sew the underarm seam inserting the Sleeve Back into the separated Sleeve Front layers. When finishing the reverse side by hand I started 1” back from the underarm. This allowed me to access the area when inserting the yoke. After finishing the reverse side by hand, finish the 1” of Sleeve Front hem that was left unfinished previously.
  • At this point it is a good idea to pin the muslin toile pattern for the Front Yoke in place and test the fit of the garment. Check to make sure CF is hanging straight. The yoke can be dropped down slightly on the angled seam above the bust to accommodate a fuller bust. Check to see where you would like the coat to end. Again, larger sizes can be fitted by widening the Fronts. Re-mark CF if needed.
Pin the muslin Yoke into the garment to check the fit. The check pattern has been drawn onto the muslin, which will be helpful when laying out the fabric to ensure a perfect match.
  • Layout and thread trace the Front Yokes and Pockets. There should be enough fabric remaining to cut a crosswise scarf.
The coat has been cut away along the Front Yoke seam leaving a piece of fabric large enough for two Yokes, two Pockets, a scarf and a small swatch to test techniques.
  • Insert stay tapes at CF on the Lower Fronts and Front Yokes. Cut all 4 stay tapes at the same time ensuring that each set of two are equal in length.
  • Close Front Yoke along CF.
  • Insert a stay tape into the short neck edge of the Yoke. Close the neck edge of the Front Yoke.
  • Sew Front seam inserting Front Yoke into the separated layers of the Front. Finish the reverse side by hand. Stop 1″ back from the Sleeve corner. This will allow you to insert the Yoke and finish the corner later.
  • Separate the layers of the Sleeve and Shoulder Yoke seams on the coat. Clip into the corner and oversew the edges on the tan layer.
  • Insert the Front Yoke into the Sleeve and sew from the Front seam to the corner of the Yoke. Remove the garment from the machine to refold and reposition. Sew from the corner to the neck edge. At this time finish the remainder of the Sleeve seam, which had been left open for an inch on the reverse side. Careful folding at this corner will keep it neat and flat. Clip the inside corner of the yoke on the reverse side. Turn the edges under and finish by hand.
Clip into the corner of the Sleeve and Yoke seam. Hand oversew the clipped edges.
  • Close the Lower Front along CF.
  • Check the neckline shape and adjust if needed. Open the layers carefully. Insert a stay tape. Fold stay tape in half and beginning at CB pin in place around to shoulder seam making sure both sides of the neckline are equal. Stab stitch in place. Close neck edge.
Check the curve of the neckline, apply a stay tape and turn edges in to finish.
  • Tun in all four sides of the pocket and close by hand. Baste pockets to coat. Using a double thread, fell stitch the Pockets in place taking a few stitches along the top edge of each corner.
  • Cut the scarf on the crosswise width of the fabric. Separate the edges, turn in and finish by hand.

The design is as current today as it was 60 years ago!

Inspiration No. 24: Viscose/Rayon Elegance

Casual Elegance with Printed Viscose/Rayon Wovens

by Malia Janveaux

History

Viscose, also known as rayon, has been around for a long time! The quality and durability have improved tremendously over the years, and viscose/rayon is part of a family of fabrics that are made primarily from wood pulp. Because it is made from a natural fiber, but manufactured through a manmade process, it is considered by some a natural fiber, by others synthetic. It has all the breathability and comfort of natural fibers and was invented with the intention of creating a less expensive alternative to silk. Viscose is truly silky smooth, drapes beautifully, and is so comfortable to wear. It can be hand washed or dry cleaned, and is a relatively inexpensive fabric that looks and feels fabulous to wear. Viscose/rayon can be used in virtually every type of fabric you can think of, from everyday staples to evening wear! As with any fiber, it can be knitted or woven in various weights, textures and finishes. In this tutorial we focus on two drapey viscose woven prints that are perfect for feminine blouses with shirred details.

Fabric

There are many more beautiful viscose/rayon printed wovens available on the website right now. Click here to check them out!

Floral/Fauna Shirred Blouse

Supplies

  • 1 spool of elastic thread (elastic beading thread is a great lighter-weight alternative)
  • Small buttons x 15

Pattern Alterations

In this tutorial, I will show you how, by making some simple changes to a TNT pattern in your stash, you can totally change the look of it! It is not as difficult as you may think.

Original pattern – Our starting point

SLEEVES: For both blouses the main alteration is the sleeves. As you can see, that alteration completely changes the look of the pattern, but it’s quite an easy change to make. I wanted to change the basic short sleeve to a long bishop sleeve with a shirred cuff. To do that I chose a pattern from my stash (Simplicity 8733) that has a sleeve similar to what I wanted. First, I compared the original sleeve pattern to the one I wanted to change it to. Here I’ve traced one over the other. Using the original sleeve cap, I gradually traced a line from the original underarm to the new sleeve joined in around the elbow. Since I am still using the same cap, I already know it will fit into the armhole.

BODICE: This blouse uses only the the bodice pattern pieces of the Armidale Dress, so to determine where you’d like your shirring to start, hold the front bodice pattern up to yourself. Draw a rough line where you’d like it to start (I wanted mine to start just under the bust). Review this marking after you make your muslin. I extended the length of the front bodice by 9 inches total at CF , and squared out from there. I then took the measurement from the front side seam and transferred that to the back bodice, again squaring out but this time from the back side seam. After making my muslin I decided to square up the side seams, adding more fullness for the shirring at the waist. The back facing pattern piece can be used, just cut it to the length of the blouse.

Shirring

The secret to shirring is elastic thread! There are some characteristic differences from one elastic thread brand to another, but most will do the job just fine. I prefer a lighter, stretchier elastic thread, as I find it easiest to use with my machine. Begin by hand winding the thread onto a few bobbins (you will go through bobbins very quickly!). Make sure to wind the thread without much tension; you don’t want the thread to be so loose it’s falling off the bobbin, but you really don’t want to wind it tightly as it will make the shirring too tight.

Use regular sewing thread on the top, and start with a 3mm stitch length. Now do some samples (practice makes perfect!). I like to start with a square of fabric that is a set measurement so I can see how much the shirring shrinks it in. Every fabric is going to be different, so sampling is key. Generally shirring is sewn in parallel rows either 3/8″ apart (my choice in this project) or 1/4″ apart. This viscose/rayon is perfect for shirring as it is very lightweight, yet opaque. Make sure to hold fabric taut from front and back while shirring.

After shirring, always steam the fabric, as this will shrink it up significantly and even out all the gathers. If the shirring is still too loose for your liking, tighten the tension on your bobbin case (usually a little screw near where the thread is pulled through the bobbin). If the shirring is too tight, loosen this screw. The 3mm stitch length is just a starting point, try different stitch lengths and see which works best for your fabric and machine.

Since shirring is like a casing made from the upper thread to carry the elastic bobbin thread, the elastic may slide as you construct your garment, so to avoid any problems leave long thread tails (minimum 2″). It is best to start your shirring about 1/4″ back from the seam allowance edges; this will help keep everything flat when you sew the seams together, but will still conceal the start of the shirring. You can do a small backstitch at the beginning and the end of each shirring row, but don’t expect it to hold securely. The side seams will do a much better job of securing the ends of all the shirring thread tails.

Construction

To determine the dimensions of my cuff, I measured how much my 8″ x 8″ square tightened up with the shirring and calculated from there. I cut a piece 16 3/8″ wide by 5″ tall. This includes my 3/8″ seam allowance around 3 edges and a 3/4″ hem.

Only the shirred areas and buttonstand construction differ from the pattern, so I will not go into detail on the neckline and sleeves. They can be constructed as described in the pattern.

CUFFS and SLEEVES: Start by serging the raw edge of each cuff at the hem, and then press up 3/4″. Begin the first shirring line 1/4″ away from hem fold. Sew the subsequent shirring lines 3/8″ apart. Try to keep the lines as straight as possible, as it will create a more even cuff width. Steam the cuff hovering the iron over the fabric to set and even out the stitches and gathers. Stitch the underarm seam of the cuff and serge the seam together. To keep the edge of the cuff neat, thread the serging tail through a tapestry needle and hide it within the seam allowance. Now run two lines of gathering stitches along the lower edge of the sleeve. Set pins to mark the four quadrants on the top of the cuff and also set pins to mark the quadrants at the lower sleeve edge. Pin the shirred cuff to the sleeve, lining up the quadrant pins and pulling up the gathers as needed. Stitch the seam together and serge close to the stitching.

Stay-stitch the neck edges on the front and back before assembling. Stitch the side seams and serge seams together. Press towards the back. Serge the lower edge of shirt. Press up a 1″ hem. Again starting 1/4″ away from hem fold, sew the first line of shirring. Do the subsequent lines of shirring 3/8″ apart. Have a marking for where you want the shirring rows to end, but when you are getting close, try the blouse on, as you may want to stop a few rows earlier than expected depending on how your fabric is shirring up. Steam the shirring portion of blouse using the same technique as for the cuff.

Now on to the facing! Start by fusing the facing pieces with a lightweight fusible interfacing, as you still want it to be soft, but with a bit more structure. Serge around the outer edges and hem. Press up a 1″ hem. Pin the facing to the blouse, and then sew, making sure not to stretch the neckline. TIP: Stitch with the shirring side up, as this way you can make sure you are sewing the shirring lines straight and catching in the elastic tails as you go. Serge the seam together close to the stitching. Under-stitch the facing.

The center front closure will have to be a fake one (no buttonholes), since this blouse is very fitted with the shirring, and it will pull at a traditional button closure leaving gaps. TIP: Add a piece of belting to both center fronts within the buttonstand facing. This helps to keep the front straight and prevents it from riding up. Cut it roughly the length of the shirring and tuck it under the seam allowance. Round the top edges of the belting pieces to prevent catching on your fabric. Stitch in place on the facing.

The pattern has a 3/4″ overlap for the button closure, but after shirring it ends up more like 1/4″. Try it on to determine the amount of overlap. Pin the overlap in place, and then open up the facing and stitch in the fold. Tack the hem of the facing down loosely, stretching the blouse as if you were wearing it. Sew on buttons and you’re done!

Teeny Flowers Wrap Top

Supplies

  • 2.5 yds of Teeny Flowers on Cherry Rayon (sold out but many other from this page would work beautifully!)
  • 1/4″ elastic

Pattern Alterations

Original pattern – Our starting point

This pattern was originally drafted to be a bit of a scoop neck at the back, since it was meant to be reversible. I decided to raise the back neck by 1.5″ at center back, gradually joining the back into the original shoulder line. If you do this, you can make a new back neck facing pattern by tracing around your new bodice back neck. Other than that, the main style change is the sleeve. I dug through my stash of patterns and found a sleeve that was the closest to what I was looking for (McCalls 7947 view C). I picked a size that was the closest fit and traced it out. I added 1.5″ to the length of the sleeve, and also moved the elastic casing to be 1.5″ up from the finished hem.

When swapping out a sleeve for one from another pattern, I like to trace my seam allowance onto both patterns. Remember that some patterns, especially indie patterns, don’t always have a standard 5/8″ seam allowance, so make sure to check that before starting. Now working on the seam line, measure from the front underarm up to the front armhole notch, note the measurement. Measure the next segment, from notch to shoulder and note measurement. Do the same for the back armhole. On the new sleeve, mark front and back notches from the measurements you just took. Then measure the remainder of the sleeve cap. Calculate how much ease is left (for this sleeve there was 3″ total as it is a puff sleeve). You can change the center notch minimally if needed, to equalize the amount of ease in the front and back of the sleeve. A puff sleeve is a great sleeve to start with, as the gathering can be adjusted to fit the armhole.

Sewing Construction

First things first, let’s make some rouleau ties. Knowing how to make these will come in handy for many projects! The pattern calls for an elastic loop and button, but I chose to replace both of these with rouleau ties, because that way the wrap of the blouse is adjustable. Start by cutting one or two bias strips 1″ wide. Fold the strip in half, right sides together, as you sew it, while also putting quite a bit of tension on it. Stitch down the center of the strip. Do not trim down the seam allowance as we want that extra fabric to fill the rouleau tie, making it round. Pull through to right side using a loop turner. Pin one end to the ironing board. and pull on the cord, placing another pin at the other end to hold it stretched in place, steam. Let it cool. My strip was long enough to cut in half and create both my ties, but if yours is not, just make another one! The final step is to tuck in the raw edges on one end of the tie (seam ripper or pin will work just fine). Stitch this end with a few neat hand stitches.

Run a row of stitching 1/4″ away from lower edge of sleeve. Use this as a guide to press up 1/4″. Next, mark 1 3/4″ up and press fold along this line. Unfold the hem now, and stitch the underarm seam. Serge the seam allowance to finish it off. Fold your hem up at the crease you made previously, and edge-stitch around, leaving a small gap for the elastic. Run another row of stitching a fat 1/4″ below edge-stitching. Measure around your upper arm and decide how tight you’d like the sleeve to be. I chose to have it quite loose, and cut the elastic the exact width of my upper arm. Feed the elastic through casing that was just created, and then stitch the gap closed. Run two rows of gathering stitches along your sleeve cap and the sleeve is now ready to go!

For the rest of the blouse construction I followed the pattern instructions, except for swapping the elastic/button for rouleau ties. One tie will be sewn to the left bodice at the front wrap (shown below). The second tie will be sewn in when the blouse is otherwise finished. The long wrap ties can be sewn using the following method, to get nice, pointed corners:

Sew the ties in 3 sections, first the top edge, then the bottom edge (press these seam allowances open before continuing), and finally stitch the end of the tie separately, tucking under the seam allowance. This way you won’t have to clip out corners of the seam allowance and will still get sharp corners at the ends of the wrap ties.  A wooden stick is very handy for pressing things that are too small to fit on a sleeve press. Mine (shown in the slide show below) is just from a hardware store and is perfect for pressing the long wrap ties.

After the side seams are sewn, serge around the hem. Next, fuse neck facing with a lightweight fusible interfacing, and serge around outer edge. Stitch to neckline making sure not to stretch out neck. Trim seam allowance down to a fat 1/8″, under-stitch facing. Press up remaining hem 3/8″ and top-stitch. Last but not least, tack the second rouleau tie to right side seam, tucking the raw edge under the serged seam.

Thank you to my beautiful model Sarah Cambel and wonderful photographer Chloe Tekavcic. I hope this article will inspire you to sew with viscose/rayon and perhaps to give you a whole new appreciation for this hybrid natural/manmade wonder! I have so many more wardrobe staples planned with viscose, as it’s just a dream to wear with it’s lovely smooth hand!

Inspiration No. 23: Swoon-Worthy Chiffon

Swoon-Worthy Chiffon:  A Special Occasion Dress

by Malia Janveaux

Fabric:

New York Designer Silk Chiffon Panel Print – 4 Panels

Lining – 2yds of silk double georgette in color #102 Porcelain

Pattern:

Lune Dress – by French Poetry


Whenever I’m invited to a special event, I get very excited because it means I have an excuse to sew myself something fancy! My friend’s wedding is coming up later this summer, and this dress will be just right for the occasion. This wonderful pattern could work with so many fabrics and look really beautiful in a more muted print or a solid color as well.

Silk often intimidates sewers, especially silk chiffon, but with patience and a couple clever techniques, silk is really rewarding to work with.

Planning

Planning how you will cut and sew a garment is a crucial step, especially with panel prints. The first step is to adjust the pattern with any changes you would usually make (in my case, I graded out the waist and hip because I am between sizes). Next, trace the pattern onto tissue paper so it will be easier to pin through and also so that you can see the pattern through the paper. Trace the seam lines onto the paper pattern.

The next step is to make a muslin to access fit and visualize how the pattern will play out on the final garment. I drew lines on my muslin along the grain of the fabric so I could get an idea of how the stripes would lay out. The neckline gaped a bit on me so I shaved 1/8″ off the bottom of the neckline as a personal alteration. Next, I pinched in approx. 1/2″ along the neckline at the hollow part of my chest. Then, I transferred theses marks to my pattern, along with notches 1 1/2″ on either side of the pinched mark. The idea is to tighten up that section by easing 1/2″ out over 3″ when we stay the neckline. I also cut a total of 3″ off the hem of the skirt to fit within the fabric panels.

Thread Tracing/Cutting

First, to prepare your fabrics, steam both the silk and the silk lining before cutting because it will shrink just a bit. The ‘silk’ setting on most irons should do the job but always iron a corner first just to make sure. A grid cutting mat like the one in the pictures is super useful for cutting slinky fabric like silk, since the fabric needs to be lined up on grain. But any type of grid will work, I even use my basement flooring seams to line up fabric on the grain if I am cutting something on the bias, since my table isn’t big enough. You just want something with 2 right angles to use as guides.

I tried many layouts before I decided on this one. This particular fabric is not symmetrical so the layout takes some thought. If you find the perfect layout for half the dress, and then go to flip it, its not going to work (a mistake I almost made). Each panel is identical, so I started by cutting the 4 panels apart. That way I could drape them up on my stand to figure out what I liked best. I decided to line up the center front of the skirt with the longest printed stripe, since I could see that it had a similar long stripe on the other side of the fabric (not a mirror image, but close).

For the bodice, I wanted it to be all pink, and that fit easily beside the skirt on the upper half of the panel. Pin along seam lines. Roughly trace lines on the paper pattern where the different colors join, as we will be matching them on the other half of the skirt.

Rough cut around the skirt leaving generous seam allowances. Try to keep the selvedges intact around the bodice piece as it will make lining it up on the lining so much easier. Flip both pieces over and thread trace along the line of pins.

The skirt pattern can be removed from the fabric, but keep the bodice pattern pinned on.

The skirt will be sewn separately from the skirt lining, but for the bodice we will be stab stitching the outer fabric to the lining and treating the two layers as if they are one.

The double georgette won’t tear along the grain as some fabrics do, so instead clip into the fabric and pull a few threads. This will create a line perfectly on grain that you can trim along. Place the bodice pattern onto silk georgette lining fabric, lining up the selvages to make sure everything is on grain. Remove the pattern carefully and pin the printed silk to lining, with pins running across the thread traced lines. Stab-stitch along the thread traced lines to hold both layers of fabric together as if they were one.

Repeat all of the steps for the other half of the front, as well as for both sides of the back. I lined them up the same way, with the center backs running along the longest stripe. Use the lines we marked earlier on the patterns for lining up the horizontal color changes. This part doesn’t have to be exact, but I found that as long as the pattern ran horizontally across the front and the back it looked much cleaner.

Right front layout
Left Front Layout

For the skirt lining, I thread traced only the waistlines and cheated on the long seams by tracing the seam line with a heat erase marker.

Staying the Neckline and Armholes

Staying the neck is crucial, since the seam is on the bias it would otherwise stretch endlessly. Cut the selvedge off the leftover silk, along the white parts of the print. I cut mine 3/8″. Now take the front and back bodice pattern pieces and pin them together at the should. Lay the selvedge tapes along the seam lines of the pattern, marking notches, shoulder seam and beginning/end of seam. Do this for the armholes as well. Next, pin the stay tape to the inside of the bodice along the seam line, then flip over bodice and stab-stitch in place.

When you get to the portion of the center front we marked for ease, just follow the notches and ease in the extra amount (should be very easy in this silk).

Seam Finishings

I chose to do all french seams, apart from the seam joining the bodice to the skirt. To do a french seam, first baste the seam along the seam line, with wrong sides together. Machine stitch 1/4″ out from the basting. Remove the basting holding both layers together (yellow), but try to leave the white thread tracing in. Trim seam allowance down to a scant 1/4″, press seam open (I recommend doing each seam from start to finish separately because they can get fraying quite a bit otherwise). Press the seam now with right sides facing. Baste once more along seam line. Remove thread tracing and machine sew along basting line. Alternatively, you can skip the second basting, and just sew the seam at 1/4″, which I mostly did on the lining, but for some seams basting it again just makes things easier.

The side seams of the skirt are partially on the bias, so they will stretch quite a bit. Clip the thread tracing so that it doesn’t prevent it from stretching. When basting the seam together, do so in 3-4 lengths of thread rather than one continuous thread, overlapping the lengths about an inch and leaving long thread tails. This allows the seam to stretch without losing your basting. Hold some tension on the fabric while sewing the side seams, otherwise the seams will pucker rather than lay flat.

For finishing the armholes and neckline, I decided to use a doubled over bias tape, since I didn’t want any of the seams showing through the chiffon. I cut bias strips 1 3/4″ wide of the georgette lining, and pressed them in half lengthwise. Once I did that, they were roughly 1/2″ wide, but do a sample since all fabric will stretch differently. I then chalked 1/4″ away from the thread traced line, and lined up the cut edge of the bias tape with the chalk line. Baste in place. Remove original thread tracing and machine sew along basting. Trim the seam allowance to a skinny 3/16″, press over to inside and cross-stitch in place. Make sure to only pick up the lining layer when cross-stitching. A handy trick for doing this is to pick up both layers on your needle on purpose, then drop the outer layer. It sounds counterintuitive but it is much easier to feel the second layer drop than it is to notice you’ve picked up a single thread of that layer by accident.

Do all the same steps for the armholes, but stop about 1″ short of both ends. It’s easiest to do the bulk of it out flat (before sewing the side seams), but we will want to do a seamless finish on the underarm after the side seams are sewn.

Once the CF, CB and right side seam are sewn in both the silk and the lining, Stitch the tiny seam at the top of the point, right sides together. Trim down and baste the two skirt layers together along the waist seam. Stitch the bodice to the skirt. Using the same bias tape we made earlier, press one edge into the fold. Then pin this tape along previous stitching. Stitch in place, ideally stitching it just a hair away from the first seam. Trim all layers of the seam allowance down and wrap the bias tape around. Slip-stitch in place.

Zipper

The original pattern calls for a zipper down the center back, but for this delicate and sheer fabric I chose to replace it with a side seam zipper to be more discreet. Using your muslin dress, see how much space you need to get into the dress if the armhole is sewn up. Mark on dress, both lining and silk. Start a french seam from about 3″ down from the marking, down to the hem. Finish it as normal on the outer silk, but for the lining, stitch wrong sides together, trim and press, but stop before sewing final row. Place the finished french seam between layers of lining seam, gradually slanting out until they are separate again. Do a final row of stitching on lining.

Now, stitch using a regular seam, from the armhole down 2″, and from the end of the french seam up the 3″ we added. Insert an invisible zipper between these two points. Flip to the right side to check that everything looks smooth. Then trim the seam allowance to equal the zipper tape width. Bind the edges, going right up to the armhole and all the way down to where the french seam starts. To reduce bulk while binding the zipper, I sewed the binding on at 1/4″, flipped it around the zipper, and stitched in the ditch from the folded side, then trimmed the raw edge down.

I chose an off white zipper, and it was hidden well with the lining, but I didn’t like the zipper pull, so I got out some nail polish and chose the best color to hide it. I then added a topcoat to seal it all in. Be careful not to go too wild with the nail polish on this part because it can easily get on the silk and too much will make a sticky zipper, so I really just painted the pull and left the rest.

Hem

This hemming technique is new to me and rather game changing! I am demonstrating it on the shoulder ties, but I also used this method to hem the dress and lining. I cut my shoulder ties bigger since it would just be one layer: 19″ long by 8.5″ wide.

First, you will need a length of Ban-Roll waistband interfacing, sometimes referred to as just ‘belting’. This can be re-used over and over so have a longer than needed length going. Pull out a few of the lengthwise threads until you have a wide 1/8″.  At your sewing machine, line up the edge of the belting with the raw edge of the fabric on the right side. Stitch along the belting, just under 1/8″. Then flip the belting over to the wrong side of the garment, and stitch once more. Carefully pull the belting out from the seam. It’s as easy as that! It’s great because it stabilizes the fabric under the foot as you sew along, and its great for making sharp corners on the shoulder ties. It would also work wonderfully if you were hemming a silk scarf.

Inspiration No. 22: A Zero Waste Topper

A Zero Waste Topper for All Seasons

by Kathryn Brenne

Fabric: Italian silvery gray floral motif cloque’ woven

Pattern: Self-Drafted Design

fullsizeoutput_63e5When Linda asked me to design something using a piece of polyester heat embossed cloque’ from a designer who I’ve admired for years, I knew the fabric would be special.  A simple design that let the beauty and texture of the fabric shine was all that was needed. I came up with this design, which gives the illusion of a lot of fabric when in reality I only ordered 50″ (1.375 yards). I draped the design on the bias for a very soft fluid look. The result is a beautiful year round garment that can be worn as a bathing suit cover up or as a topper over slim pants and a turtleneck.fullsizeoutput_63ec

Fabric Tips & Process

I used a heat set embossed textured cloque’ fabric that was lightweight and sheer.  The embossing added some crispness to the fabric.  This design would also work well in a silk organza,  satin face organza, silk/cotton voile or any fabric that is light and crisp, in a solid color, a print or with a surface texture.

The fabric I used was 49″ wide.  The fabric requirement for this project is a square.  Fifty inches of fabric gave me a generous square.

Fit and Details

This design will fit a lot of figure types.  There is minimal waste and no alteration for narrower fabrics.  The garment is cut on the bias and provides a loose, forgiving fit.  The design or square can be made shorter by taking a bit of length off at center back. The garment fastens with narrow rouleau ties.  The edges of the garment drape loosely.  The ties could be adjusted for larger figures with a narrower overlap.

The position of the armholes helps to hold the garment in place. Below is a close up  photo taken on my 1″ grid mat.  You can print out the photo and enlarge it to equal 1″ squares and use this as a template to mark your armholes.  The armholes can be positioned closer or further apart depending on your size. The top of the armhole to the finished edge of the collar measures 10″.

Armhole1

p1060687

Draping the Design

I have done the work of creating the design and pattern for you to use.  With the photos taken on my grid mat as a reference you should be able to copy my pattern.  I would suggest cutting out a trial garment first to ensure you have the armholes in the correct position.

For those who would like to try their hand at draping, here is how I created the design:

  1. Begin with a square of fabric.  Fold the square diagonally in half and lightly crease.  Open up the square and draw the crease in pencil using a yardstick. Fold the square diagonally again and pin the edges together creating a cone shape.
  2. Drop the cone onto a dress stand aligning the pencil line with the centre back of the stand.  Pull down slightly on the fabric as the actual fabric will be softer and stretch more than muslin. Pin the cone in place along CB. Place a pencil mark across the shoulder blade area of the back for the edge of the armhole.  On my size 10 dress stand the markings were 11″ apart.  Smaller sizes will be closer together while larger sizes will be further apart.p1060687
  3. Cut a straight 9″ vertical opening in the centre of each armhole.  This will allow you try the test garment on.  Using the shoulder as a guide, pin out an armhole shape.  The shape should be egg shaped. When laid on a table, the armholes should angle inward at the shoulder.
  4. Remove the fabric from the stand and use a curved ruler to smooth out the shape of the armhole. Trim out the center leaving a good ⅜” seam allowance. Fold the garment along the pencilled CB line to make sure that both armholes are the same size and in the same position.

    This slideshow requires JavaScript.

  5. Try the garment on.  Fold under and pin the square edges creating a rounded hemline and smooth curved collar. Check the depth and position of the armholes. If you find that they are a bit too far apart as I did, pin a ½” tuck down centre back. If needed, reshape the armholes or add a scrap of fabric in.
  6. Use curved rulers to smooth out the edges of the design. Trim away excess fabric.
  7. Trim away any extra fabric from the armholes leaving the cut edge as the finished edge with no seam allowance. I have included photos on my mat grid to give you an idea of how much I trimmed away. Please note that although the photos show a pencil line, which appears to be a seam allowance the cut edge is actually the finished edge.armhole2armhole3armhole4armhole5

Layout and Cutting

pattern1Lay out the pattern on a square piece of fabric with the front edges aligned along the selvedge and the weft.  I moved my pattern back about ½” to avoid the unattractive selvedge.

P1060714Pin around the armholes. Thread trace around the armholes.  Cut out armholes leaving a generous ¾” seam allowance. Trim excess fabric from the outer edges. Keep excess fabric to make armhole binding and rouleau ties.

Stitching and Finishing the Edges

P1060720I used a quarter inch foot and a straight stitch throat plate with a size 60 Universal needle to sew a ¼” around the outer edge of the garment.  My machine has a built in dual feed but alternatively you could use a walking foot if needed. As you are stitching try not to stretch out the fabric when you come to the sections that are on the bias.

CloqueEdging

Turn the ¼” edge under and press.  ☀︎A word of caution about pressing this fabric!  The texture of this fabric has been heat set.  Polyester takes and will hold the texture very well, however over pressing will flatten and remove the texture.  When turning the edge under press only the stitched edge and do not move the iron beyond the stitching.

fullsizeoutput_63b7Use a pair of duckbill appliqué scissors to carefully trim the ¼” seam allowance to a scant ⅟16″.

Beginning at the center of the hem on the Back, use a zigzag 2mm Roll and Shell Hemmer to turn the edge.  On my Bernina I used foot #68. Switch back to an all purpose throat plate. I used a stitch width of 2.5mm and a stitch length of 1mm.  The straight stitch that was just done will hold the edge as the foot rolls it under.  Take your time working around the curves.  You do not want to over stretch them.  You may find that some of the curves seem to be too tight with the straight stitching and start to pull.  In this case I stopped and with the fabric still in the foot, I snipped a few of the straight stitches to release the stitching.  I did not back stitch at the beginning or end.  Instead I pulled the threads to the wrong side, knotted them and buried the tails in the roll.

FE8E3IbwSBeaVb2qvaJUXADo not press the finished edge.  Instead, lightly steam it coaxing it into gentle waves.

An alternative option for finishing the edge could be a rolled edge on your serger.  If you do not have a rolled hem foot for your machine, you can try to zig zag over the trimmed raw edge using the same machine settings.  I tried this technique but found the narrow edge difficult to control on this fabric without a rolled hem foot.

Armhole Binding

After cutting out the fabric I used the scraps to create binding for the armhole and rouleau ties.  You will have a few triangular shaped scraps that have one edge on the bias.  Press the fabric out flat to remove the texture.

CloqueCuttingWheelFor the armhole binding, I cut my bias strips ¾” wide.  

Double StringsI found the thin fabric stretched out and narrowed slightly as I fed it through a ¼” bias binding tool.  Although you don’t have many scraps, test a sample first to check the cut width.  Depending on your fabric a width of ½” to ¾” should work.

This slideshow requires JavaScript.

Beginning at the underarm, open up the binding and pin the fold to the tacked armhole.  Tack in place.  Fold the beginning of the binding up at a 45° angle.  As you come around to the end, overlap the end onto the beginning. Machine stitch. Trim all layers to a scant ¼” seam allowance. Roll the binding to the inside of the garment.  Pin and then baste to hold. Use a slipstitch to sew the edge of the binding to the garment.  Use small, short stitches and pick up a single thread from the garment to prevent the stitching from showing on the right side.

Steam lightly and finger press to finish.

Rouleau Ties

CuttingTieFor the rouleau ties I cut ¾” strips.  I cheated a bit as the strips were slightly off the true bias but they worked out fine. I was able to cut them approximately 15″ long.

Tie2Using the ¼” foot and straight stitch throat plate I folded the strips in half and sewed a wide ⅛” away from the folded edge. Leave long thread tails.  

NeedleThread a bodkin with the thread tails and feed the needle eye first through the folded edge to turn the tie through.  

tiesPin the ends of the ties to the ironing board and steam lightly.  I tied a knot in the one end and sewed the other end to the garment.  Try the garment on to decide where to position the ties.tie

Zero Waste

zerowasteNot only is this a versatile, very wearable garment, it produces almost zero waste! After making the binding and ties, only a small handful of scraps were all that was leftover. 


Inspiration No. 21: Tangerine Dream

Tangerine Dream: My New Summer Uniform

by Malia Janveaux

Linda’s note: Malia actually submitted this tutorial to me last spring! Before I had a chance to post it, it seemed like similar orange jumpsuits were showing up on various blogs, so we decided to hold off for a while! Malia brings her couture training into the mix, guiding us through some techniques that will bring your finished product up a notch! Please be sure to click through the process photos for visuals: Instructions are given first, and then a series of process photos follow for each step. –Linda

Fabric: Modal/Bamboo/Tencel Woven Twill in the Bittersweet colorway

Pattern: Zadie Jumpsuit by Paper Theory

This jumpsuit, I am never taking it off! It is so comfortable yet at the same time looks really put together. I’ve styled it to be a bit more dressy for a friend’s wedding, but will also wear it more casually all summer. The Zadie jumpsuit is such a versatile style and the Modal/Bamboo/Tencel Woven Twill fabric skims the body in a soft and flattering way. With the added touch of french seams, it is a pure pleasure to wear.

Check it out, I even match my car! HAHA I’m hiding from the paparazzi !! JK

Up Close Details Gallery

Fabric Tips & Process

First let’s talk about the fabric. This fabric is wonderful to wear, feels very cool to the touch and is available in a number of colors. The color I chose is this beautiful muted tangerine. With a pattern like this one, sleek and simple with the interesting wrap feature, I find a solid fabric really shows it off best. The only thing you have to watch out for while working with this fabric is the iron: it does not like high heat. I pre-washed my fabric on delicate/cold cycle and put it in the dryer on low for only about 10 minutes and let the fabric air dry after that. Always try washing a scrap of fabric first, especially if you are washing in a different manner than recommended. The manufacturer recommends hand washing and line drying, but I find it really difficult to hand wash and line dry a full length of fabric, and often there are other options! Be sure to test a sample as different detergents and washing machines can have varying results.

Pressing: Use very low heat while ironing. Cover your ironing board with flannel, this will help to prevent making your seams shiny with the iron. Try to press from the wrong side as much as possible, and always use a press cloth on the right side. I found a scrap of the actual fabric worked best.

Alterations: I lengthened the pant by 1.5″ at the hem (I am 5 ft. 5″ and I wanted a slightly longer pant). I shortened the front and back bodice by 1/4″ on shorten lines. I shortened the pant crotch front and back by 1/4″ on shorten lines. And finally, most importantly, I added 1/4″ to all seam allowances. Why? Because this particular pattern has 3/8″ seam allowances but 5/8″ is needed for the french seams.

Layout and Cutting: I found that the pattern fabric requirements were pretty tight, and I know that they were meant to prevent waste, but for me it was really not enough fabric to cut out my size, especially with the extra 1/4″ seam allowance I added. Therefore, if you are doing french seams, you may want more fabric than suggested. I chose to swap the fabric waist ties for grosgrain ribbon. I couldn’t find a good color match, so I dyed it myself! If you choose to use ribbon as I have, remember to cut the ends at the angle the pattern indicates. I like to use trace tacks instead of cutting notches, especially when I am doing french seams, since I don’t want a notch to be cut out of my seam on the inside of the garment. Don’t forget to stay stitch neck edges, as this will save you so much trouble!

Tip: Tear a straight edge along cut edge of fabric, this will help to line up fabric perfectly on grain. Since we don’t want to tear a straight line through the fabric every time we need to rearrange or pull more fabric onto the cutting table, I use my gridded cutting mat, pick a line and line up my yard stick to create a straight line. Pop in a few pins along the line and you now have a straight edge to line up the grain again for the next layout of pattern pieces.

French Seams: I chose to substitute the overlocked seams with french seams, for a cleaner finish. If you choose to do so, don’t forget to add 1/4″ to all your seam allowances! The pattern only includes 3/8″ seam allowances, and it is much easier to do french seams with a wider seam allowance. Start by placing your pieces wrong sides together. Stitch at 3/8″. Press flat. Trim to scant 1/4″. Press the seam open (remember to use a press cloth since you are technically pressing on the right side, even though it doesn’t seem like it yet). Now fold at the seam so that right sides are together, and press. Stitch the seam at 1/4″. I find that a presser foot with a guide makes this process super easy, but it is not necessary. Press flat once more. Now from the right side of the garment, press the seam in one direction, again using your press cloth, and being extra careful not to press the seam through because that is when you will get shine. Work each seam separately from start to finish of the french seam, otherwise the fabric will start to fray and all the little threads will get stuck in the seam and will be a nightmare to pick out.

Pocket: Start by fusing the pocket opening on the wrong side, as this prevents the pocket opening from stretching. I used a lightweight fusible interfacing: I cut it 3/4″ wide, then pinked the edge. Stitch the pocket to the front pant. Trim both layers of the seam to 3/8″, then grade down the pocket seam allowance only. Press and edge-stitch (I chose to edge-stitch the pocket opening, rather than do an under-stitch as the pattern suggests. I found that it created a more crisp edge with this drapey fabric). Now finish the bottom of your pocket with a french seam. Match markings at the waist to create a pleat, pin the pocket in place, and baste. Baste the pocket down on side seam as well.

Bodice Side Seams: This seam has to be done quite differently than the pattern suggests, if you are choosing to do french seams as I did. It just requires a few more steps than a regular french seam because of the opening for the waist tie. The first thing to do is check that your waist tie will fit the opening. Since I was using ribbon that wasn’t the exact width of the pattern piece, I moved my marking up a bit. Next, chalk a line where the opening will start (at the thread marking), mark the seam allowance (5/8″) and finally draw a diagonal line that will be clipped. Stitch the first pass of the french seam on side seam, ending your stitching just above the diagonal mark. Clip in to the corner. At the underarm, the seam will not want to lie flat because of the curve. So after the 3/8″ seam is sewn and trimmed to scant 1/4″ for french seam, clip into the seam allowance along curve. Continue the french seam in the normal manner, ending your stitching exactly where your chalk mark is (at the point that was clipped). Chalk the seam allowance (5/8″) on the side seam opening. Press along the chalk line. Turn the pointed ends in, and press the seam under one more time. Add some fray check to the clipped point, being careful not to get any on the rest of the garment. Once dry, edge-stitch the opening.

Front Wrap: Mark where the stitching will end on the front crotch seam (marking on the pattern). Start the french seam in the normal way, starting from the back, but only stitch to about 1.5″ below marking on the front. Then, only trim the seam to an inch below that stitching. Press open and right sides together in the normal way, but again stop stitching the final 1/4″ about 3″ below the marking this time. Now apply the binding to the neckline (see notes on binding below), running it right off the edge at marking. Once the binding is complete, go back and finish the french seam on the front crotch, stitching it right through the bindings.

Binding: Don’t forget to attach your waist ties before this step! I always test a few bias strips in different widths before I cut my long binding pieces. Some fabrics will stretch out thinner than others and it may be necessary to cut it slightly wider or slightly narrower. For this fabric the width the pattern suggests is just perfect for the 3/4″ bias binding ironing tip. Once the bias is made, press it in half, making sure one side is longer than the other, this edge will get caught on the inside when the binding is topstitched. If necessary, seam two pieces of binding together and line up at CB. Lay the binding on the pattern and mark the right length for each section. Pin the binding right sides together with bodice neckline. I even checked with the pattern again after I pinned my binding on. Ease in a little extra binding around the sharp curve at the waistline, it will need it to make it around smoothly once the binding is folded to the right side. Stitch binding just a hair to the outside of the fold line. Fold over the binding and pin. Edge-stitch the binding, making sure to flip your waist ties out so they get stitched down in the right direction.

And finally I gave it a good steam, put it on and never took it off!

Inspiration No. 20: A Transitional Topper

Between Seasons; A Transitional Topper

By Kathryn Brenne

Pattern: Vogue 1590 Modified

Fabric: Viscose/wool blend boucle’ knit suiting- bright moss

**Editor’s note: To see all of our viscose/wool boucle’ colors, click here!

In that time of year between seasons, when the weather is still fluctuating between chilly and mild, it’s great to have a lightweight topper that still provides some warmth! While navigating around town, doing errands, getting your kids (or grandkids) to soccer practice, etc. this viscose/wool boucle’ suiting fabric is the perfect choice. Made from a knit construction with a low pile, it does not ravel, and because it is blended with viscose the fabric has a lovely drape.
I chose the bright moss color and combined it with purple stitching to make an unlined mid-thigh length coat with pockets and a statement collar. The loose fit allows me to layer it over sweaters for added warmth, or I can easily wear it on its own on warmer days.

Fabric Prep

I ordered 3.5 yards of fabric. I wanted to experiment with the fabric by felting it slightly, so I cut a 6 inch square swatch and tossed into the washing machine and dryer with a load of towels. I was very happy with the results! My 6 inch square felted slightly and measured 5.5 inches in width and 4.5 inches in length once it dried, and the finished texture was very pleasing. Although the fabric shrank in both length and width I still had enough to make a 31.5 inches finished length coat. Using my sample as a guideline I would recommend purchasing an extra yard of fabric if you intend to felt your fabric.

Pattern Prep

I liked the simple lines of Vogue 1590 . The original pattern includes a hem allowance, but I left the hem as a raw edge, which you can do with this boucle’. I lengthened the pattern pieces by 4.5 inches. With the 1.5 inch hem allowance that was included on the pattern, this lengthened my finished garment by 6 inches, bringing it to mid thigh length.
I omitted the belt, instead opting for a loose silhouette with a one button closure.
I reshaped the very full sleeves by straightening out the underarm seam and omitting the dart at the sleeve hem (details below).
I lengthened piece #3 the side Front by 1.5 inches bringing it to the same length as the other body pieces before adding the same 4.5 inches to the new length. NOTE: After completing the pocket, I saw that I could have lengthened piece #3 1.5 inches and left it at that length. At the time I was unsure of how deep I was going to make the pockets so it was better to be safe than sorry!
I cut my garment as a size D. I am 5’9” tall.

Layout and Cutting

If possible I would recommend using a nap layout. Once my fabric shrunk I had to turn piece #3 against the nap. It did not show as different but when possible I prefer to cut all pieces running in the same direction.
I cut the collars on the lengthwise grain and put a seam at center back. These would work equally well on the crosswise grain if your layout permits.
I used pattern weights and a rotary cutter to cut out the pattern pieces. The rotary cutter gave a nice even edge to the unfinished raw edge hems.
Mark notches and circles with tailor’s tacks.

Needles, Thread and Notions

I used the following:

-Universal size 80 needle throughout.
-Guttermann 100% polyester all purpose thread for the garment construction in a slightly darker shade of green.
-One spool of wooly nylon serging thread and 2 spools of Gutermann all purpose thread to create the lettuce edge on the collars with my serger. All serger threads were purple.
-One large button and 1 small anchor button for the inside of the coat.
-Two strips of woven featherweight woven interfacing cut on the lengthwise grain, one inch wide by the width of the top edge of the pocket.
-Two strips of woven featherweight interfacing cut 3/8 inch wide by the length of the shoulder.
-One roll of 1/4 inch wide water soluble double sided transparent wash away tape.
-Chalk marker.
-Sharpie permanent marker in a color to match your serger thread.

Lapped Seam Construction

Non-raveling boiled wool is the perfect fabric for lapped seams. With lapped seams, one seam allowance is removed from the seam before it is lapped over the under layer and stitched. This technique creates a very flat seam. The raw edges give definition to the lines of the garment.
To complement the lapped seam construction I used raw edges along the neck, front and hem edges.
I cut all of the pattern pieces with 5/8 inch seam allowances. As I constructed the garment, I removed seam allowances as needed. When planning a lapped seam garment, generally the seams lap from the front towards the back. This means that the seam allowance would be removed from the front as it laps over the side front. Usually the side front would overlap the back, but in this pattern, the side front of the garment included a pocket detail with several layers. It was easier and smoother, in this case, to construct the pocket first and then lap both the front and the back over the side front. All of the other seams were done in the usual way: The front overlaps the back at the shoulder, the front sleeve seam overlaps the back, and the body overlaps the sleeve.

Sewing Machine Settings

I used the utility triple straight stitch that is a standard stitch on most machines. The machine stitches forwards and backwards and has a two-stitch repetition This stitch is often used to reinforce the crotch seams on pants. I lengthened the stitch to 5 mm. The triple stitch provides extra strength as well as stitch definition. The longer length highlights the stitching. But please note: this stitch is best suited to long straight seams. It does not work well around tight curves.
I used an edge stitching or edge joining foot and moved the needle to the left when stitching the seams.

Serger Settings

I created the lettuce edge stitching around the collars by setting my serger as a 3-thread rolled hem. The settings on my Bernina serger were: right needle 3.5, upper looper 3.5, lower looper 7.5, differential feed 1, cutting width as narrow as it will go, and the stitch length .8. The rolled hem lever was pulled forward. Test out your settings on both lengthwise and crosswise scraps of fabric and adjust as needed.
The wooly nylon thread in the upper looper puffs up and helps to fill the stitch. It is the upper looper thread that wraps around the cut edge filling it in. The tight tension on the lower looper pulls the upper looper thread over the edge to the underside. Regular all purpose thread in the needle and lower looper are barely visible.
I used purple threads to create a contrasting lettuce edge. Although the wooly nylon covered well, there were a few places where a bit of the green fabric showed through my stitching. I used a purple Sharpie marker to color the green that showed through. This was a personal choice. My husband thought a bit of show through was fine!

Construction Techniques

Pocket

  1. Chalk the pocket fold line on the right side of the fabric pattern piece #2 pocket. Press under.
  2. Fuse a strip of interfacing to the pocket hem allowance.
  3. Chalk a 1” topstitching line. Stitch to hold hem allowance in place.

4. Lay pocket piece #2 over side front piece #3 side front. Chalk a line parallel with the top edge of the pocket 10” down. Pin and stitch the two layers together.

5. Turn pocket/side front over and trim the lower edge of side front 1/2” away from stitching. Pin layers together along side seams.

Stitching Lapped Seams

  1. Chalk 5/8” stitching line on each edge of the side front/pocket sandwich.

2. Chalk 5/8” seam allowance onto the inside edge of the front. Use a rotary cutter and ruler to remove the seam allowance from this edge.

3. Apply double sided tape in the seam allowance of the underlap layer (side front in this photo).

4. Align the raw edge of the overlap to the chalk line of the underlap. Press firmly on tape to hold. Pin. Use the triple stitch to sew in place leaving long thread tails at the hem.

Stabilizing the Shoulder Seams

1. Cut two lengthwise strips of wool boucle 5/8” wide by the length of the shoulder seam. Fuse with a piece of featherweight interfacing.

2. Pin the shoulder stay tape to the underside of the back piece #4. Set up and stitch a lapped shoulder seam catching in the stay tape with the stitching.

Collar

  1. Lap the center back collar seam and stitch. (I cut each collar with a seam to make better use of my fabric layout, but you may be able just cut it on the fold.) On the underlap, trim the seam allowance close to the stitching using duck billed appliqué scissors.

2. Stitch the lettuce edge on the serger. I stitched the long edges of each collar first. Pull on the fabric slightly to stretch it as it feeds into the machine. Too much stretching creates too much green showing through. Practice first to obtain the best results. After stitching the length of the collar, stitch the ends beginning at the neck edge and working out towards the already stitched outer edge. This will mean that one end is stitched from the wrong side but it does not show as different and the control offered by beginning at the neck edge is better than starting at the outer edge. Leave long thread tails. Thread the tails into a tapestry needle and weave through 1/2” of stitching to bury the tail. Trim excess tail.

Neck and Front Edges

  1. Chalk neck edge seam allowance on front and back. Trim away the seam allowance along neck edge. Trim away the seam allowance on the front edges of the front and front facing.

2. Baste the two collars together along the neck edge. Chalk 5/8” on both the right and wrong side of the collars.

3. Align front and back garment neck edges to the chalk line on the wrong side of the widest collar. Hand baste layers together.

4. Apply tape to the wrong side of the front edges. Align the edge of the front facing with the raw edges of the front.

5. Place the garment on the stand to ensure that the length of the front facing works with the shoulder seam of the back neck facing.

6. Join the front facing to the back neck facing with lapped seams.

7. Pin the front facing in place along the neck edge. The edge of the front facing should be sitting 5/8” above the chalk line on the collar.

8. Hand baste the collars to the seam allowance of the front facing. (shown in yellow basting thread)

9. Machine stitch up the front, around the neck edge and down the other front from the good side of the fabric.

10. Trim the excess seam allowance away from the front facing around the neck edge.

Sleeves

  1. I removed the sleeve dart from the bottom of the sleeve. Straighten out the under arm sleeve seam.

2. Set up lapped seam. Use lots of pins to hold the edge in place. Alternatively the seam could be basted by hand. Turn sleeve inside out. One sleeve will be sewn from the underarm down towards the cuff while the other will be stitched from the cuff up. The sleeve is wide enough and the fabric stretchy enough to stitch into this tunnel, but take your time and sew slowly.

3. Set up the armhole to overlap the sleeve. Pin the sleeve into position. Hand baste very close to the edge. Machine stitch beginning at the underarm.

Buttonholes

These will be the easiest buttonholes you will ever make! I always do a sample first to test size.
1. Measure the length of your button and add a bit to allow the button to slide through easily. For my almost 1 1/4” button I chalked a 1 3/8” buttonhole.

The buttonhole opening should sit half the width of the button away from the front edge. As buttons get bigger, this spacing can decrease slightly.

2. Chalk two lines 1/8” apart. Chalk the beginning and end of the buttonhole.

3. Stitch around the buttonhole opening. I used the triple stitch but once I turned the corner I hit the pattern begin button on my machine. If your machine doesn’t have this feature try stitching around the buttonhole twice to reinforce it. I shortened the length of the triple stitch to 4 mm. Stitch again 1/4” away from previous row of stitching. Knot and bury thread tails.

4. Cut down the center of the buttonhole. If the sample is suitable repeat the technique on the garment. I added a smaller button to the opposite inside front and stitched a smaller buttonhole to the left front. This second button helps to anchor the front and prevents the hem from dropping.

Finishing

  1. Knot off thread tails along the hem edges. Use a self threading needle to bury the thread tails into the seam allowances.

2. Pin the facing in place.

3. Use a loose hem stitch to hold the facing in place.

Inspiration No. 19: Plaid: A Perfect Match

Plaid: A Perfect Match

by Malia Janveaux

Patterns: Butterick 6563 & Arielle Skirt by Tilly and the Buttons

Fabric: Fine merino wool plaid **

**Editor’s note: To see all of our plaids, click here!

As sad as I am to see summer go, fall and winter are my favorite seasons to dress for. That may be because most of my wardrobe is made up of warmer clothing, since so much of the year is freezing up here in North Bay! Plaid is a classic staple in my wardrobe, both in garments I've bought as well as several I've made. I really enjoy working with plaid because it is so satisfying to see all of your careful and thoughtful planning and cutting match up just right!

As sad as I am to see summer go, fall and winter are my favorite seasons to dress for. That may be because most of my wardrobe is made up of warmer clothing, since so much of the year is freezing up here in North Bay! Plaid is a classic staple in my wardrobe, both in garments I’ve bought as well as several I’ve made. I really enjoy working with plaid because it is so satisfying to see all of your careful and thoughtful planning and cutting match up just right!

Inspiration: Baum und Pferdgarten

I fell in love with this plaid ensemble as soon as I saw it, from the exaggerated pointed collar to the button up fly front on the skirt. I thought this would be such a great outfit to mix plaids, but it is equally fabulous all in one matching plaid. I also love how with all of the details like the yoke, collar and pockets one can play with the direction of the plaid.

Source: https://www.modaoperandi.com/baum-und-pferdgarten-ss19

Pattern Search and Alterations

When I look for a sewing pattern to make something similar to a RTW garment, I look for a pattern that has the most in common with my inspiration picture. You may be surprised to learn that the most important features to look for in your pattern are not the RTW design details; instead try to match the basic shape, cut and fit. The sewing pattern sometimes won’t look much like what you are trying to make, because things like collar, sleeves or closures are much easier to change than the basic garment shape. Also, pay close attention to seam lines and decide if you are okay with it differing somewhat from the inspiration garment.

Small changes can make a huge difference when it comes to fit. I recommend making a muslin, especially if you will be using a plaid. We will spend so much time matching the plaid that it would be a shame to have to let out or take in a seam significantly and have all that matching work go to waste.

SKIRT: Arielle Skirt by Tilly and the Buttons

I chose this pattern because it was the exact cut and fit I was looking for: ultra high waist, fitted, faced waist. Although it may not seem to be the case at first glance, changing this pattern from an asymmetrical design to a center front fly closure is quite easy!

  1. Start by cutting out the right front and back pattern pieces for the short skirt version. We will be altering the right skirt pattern piece and using that for both front pieces, so we do not need the left front skirt. Just add a 5/8″ seam allowance to the center front line on the right front skirt (and either cut off, trace off or fold under the rest of the pattern piece). As simple as that, you now have a symmetrical skirt with a center front seam!
  2. Optional: I added 1/2″ to the hem allowance, and turned up a 2″ hem when sewing.
  3. Optional: I wanted a more A-line skirt silhouette, so starting from nothing at the hip, I flared out to 1″ at the hem on both front and back side seams. This gave the hem an extra 4″ in total. You can leave your pattern as it is, or flare out the amount that suits you.
  4. At this point, I made a muslin. For such a simple yet fitted skirt, a perfect fit is essential. I tweaked the fit on myself a bit on the side seams, and I also marked where my fly would end, as well as the welt pocket placements. Keep in mind that your fly front has to be long enough so that you are able to get into the skirt. If you do not like the look of the fly being too long, you could add an invisible zipper on the side seam.
  5. Now that you have your fly length determined, draft a fly facing and fly shield. I’ve attached a pattern that can be altered for button size and fly length (at the bottom of the article).
  6. I chose not to use the pattern’s waist facing; instead I traced off my own from my now altered skirt pattern. I like to cut my two front waist facings long, since I am dyslexic and no matter how many times I check that I’m cutting it correctly I seem to end up with them backwards! 😂 Your left front waist facing will be the length of the skirt front waist, but the right front waist facing will be different. It will need to be the length of the waist minus the width of the fly shield, plus 1/4″ seam allowance to attach it to the fly facing later on.
  7. Tweak the welt pocket placement from your muslin and trace a 1/2″ by 5.5″ rectangle. For the welt lips, just cut strips of bias 1.5″ wide. Check out Kathryn Brenne’s fabulous EOS article on how to sew the perfect pocket. You could also swap the flap welt pocket for any pocket you’d like!

SHIRT: Butterick 6563

As you can see, this pattern has the perfect style lines for my shirt, but since it does not have a yoke, long sleeves, or the exaggerated point collar, it requires a bit of pattern drafting to add in those details. This is not nearly as scary as you may be thinking! Also, you may own, or find another pattern that already has a yoke and long sleeves, so if you do, you can skip or simplify these steps.

  1. YOKE: First decide where you want the yoke lines to be on the front and the back and draw them in. The back shoulder has a bit of ease, but since we are adding a yoke we can remove the excess ease from the armhole edge of the back shoulder. Trace off new pattern pieces for the front and back yoke, and the lower front and back, adding seam allowances
  2. SLEEVE: Trace the stitching lines around the full upper half of the bodice patterns, front and back. This is always helpful when we will be playing around with the sleeve and collar. Measure the neck and armholes along the traced sewing lines and keep a note of these measurements. Starting with the puff sleeve pattern, measure around the sleeve cap and compare the measurement to the armhole measurement. This will determine how much ease is built into the sleeve. Since we don’t want a puff sleeve, remove most of the ease by folding in equal amounts in 4 places on the sleeve. You want to leave about 3/4″-1″ ease in the sleeve cap for a regular sleeve. Now re-draw the cap into a smooth line. (Alternatively, you can pull out a regular sleeve from another pattern and compare the measurements, and just use it as your base instead). Now that we have a basic sleeve to work from, add 12″ to the sleeve length and flare out the underarm seams about 1″. I found this wasn’t quite enough fullness for the look I wanted, so I slashed and spread, starting from nothing at the sleeve cap to 5/8″ (measuring from lower edge of the original pattern) at the center slash. Then again either side of center but only 3/8″. Muslin your sleeve before cutting into the fashion fabric, and try sewing it into your armhole. Sleeves are finicky and take some tweaking to get just right. Mark 1/2″ on either side of the underarm seam at the lower edge, this will indicate where to start and stop gathering stitches, so that 1″ is flat at the underarm going into the cuff.
  3. CUFF: You can still use the same cuff pattern from the envelope.
  4. COLLAR: The original pattern is drafted for a convertible collar, but I wanted something with a more tailored look, so I opted for a collar and stand. I’ve attached a copy of the pattern (at the bottom of the article). Collars are so hard to get just right, I often pull out my favorite one and use it on multiple patterns. If you choose to use this collar, lower the CF neck by 3/8″ to make room for the collar stand. Now measure around the neck on the pattern and adjust the collar and stand pattern to fit, adding or subtracting from the center back. Since we are doing a collar and stand, we don’t need the center front facing going all the way to the shoulder; just go straight up instead.
  5. BUTTON STAND: I never follow the button and buttonhole placement from patterns. It is much easier to do this step when the shirt is otherwise finished. Try it on and place a pin at the level of your bust point. This is your starting point. We also want to have a button on the collar stand. Now you can space your other buttons above and below these established points. They should be somewhere around 3″ apart in distance, but the second button is usually a bit closer to the collar (this allows you to play around with the button placement and find a measurement that looks best).

Cutting

Preshrink fabric before cutting by steaming it with a damp piece of muslin. Wool will shrink significantly, so it is a very important step. It is one of the many great qualities of wool and a reason I love to work with it. You can shrink in wool easily for sleeve caps or bust ease and create really beautiful shapes in your garments, but this also means that if you don’t preshrink it, every time you steam a seam it could shrink up. Even if you don’t plan to wash your garment it is still important to preshrink it so that it doesn’t shrink during construction. Preshrink from the wrong side of the fabric. Hang fabric to dry completely, and if necessary re-press before cutting. 

Cutting plaid can be intimidating at first! Just be patient and definitely measure twice, cut once! First look at your plaid, note if it is symmetrical or not, and where the repeat is. Sometimes it is not obvious until you start cutting and realize it’s too late (I have made this mistake on more than one occasion 😣). This particular plaid is symmetrical and very consistently woven, which makes cutting much easier. Start by laying out your fabric in a single layer. All pattern pieces will be cut in single. Start with your main pieces; in this case it is front and back bodice. First, choose a line for center back and pin in place. Next, choose a line for center front. I chose the pale yellow line since this will be helpful when doing my buttonholes. Before pinning the front on, you will also want to line up the plaid stripes horizontally. I don’t worry so much about vertical lines at the side seams but keeping the whole shirt on the same level horizontally is very important. Using a tissue paper pattern makes it easy to line up plaids since you can see through them. Mark dart points with tailor tacks. Before removing the pattern piece, trace on a few of the intersecting plaid lines, as that way you can line it up exactly for your second mirrored piece. Make sure to flip your pattern pieces since we are cutting in a single layer.

Sleeves will not match everywhere so concentrate on matching them with the horizontal plaid stripe. Look for points on your pattern, such as the front notch on the sleeve, as a guide for where to match the plaid.

The collar will not match either, you can play around with the placement of this piece, choose what looks the most pleasing at the front, and if the center back matches a stripe, then consider it a bonus. You should be able to have both fronts of the collar match as I have, but some plaids that are less symmetrical may not allow that.

Yokes are cut on the bias as a design detail, so no matching! Yay!

Sewing

If you’ve done all the planning correctly while cutting your plaid, sewing will be a breeze!

The only advice I have is to use a ton of pins. I like to pin in every plaid line, and pinning at the edge of each line is even more accurate. If it’s a particularly difficult area to match, try basting the seam first by hand before sewing it on the machine. Sew right up to your pin before removing it to avoid the fabric shifting.

Interfacing

For the skirt I would recommend interfacing the waist facings, the fly components as shown below, as well as the area around where the welt pocket will go and the pocket flaps. I used a medium/lightweight tricot interfacing for all these areas.

For the shirt, I would recommend interfacing one half of the cuff and the center front facings with medium/lightweight tricot. I chose a heavier woven interfacing for the collar and collar stand. Just interface one collar and one stand, the other half will not be interfaced.

Button Fly Front & Faced Waist

Start by interfacing half of the fly shield, the fly facing interfacing to right skirt, and a strip of 3/4″ interfacing to left front. Fold the fly shield with right sides together and stitch top and bottom, trim and turn to right side. Stitch the skirt from the hem, up to point where the fly will end. Stitch the fly facing to right front. Stitch fly shield to left side using a 3/8″ seam allowance, just like you would with a zipper fly; we want the fly shield to sit back from center front so that it doesn’t peek out from under the fly. Additionally, the fly shield should be sewn on 5/8″ down from the top edge of the skirt, since we’ve already sewn the top of the fly shield. Rather than clipping the seam allowance below the fly, I like to just press it gradually back into one side.

Stitch the waist facing piece to the right side of skirt fly facing, using about 1/4″ seam allowance (if you’ve done like I did and cut your front waist facings extra long, measure them now and trim down before sewing this first seam). Fold the waist facing back over the fly facing, and stitch the top of the skirt. On left side of skirt, stitch the waist facing to the skirt up to fly shield point. Press in the seam allowance on the edge of the waist facing and fold it down over the fly shield seam allowance. Slip stitch in place by hand.

Mark your button holes, stitch and slash through (your button and buttonhole placement will likely be different than mine, depending on the size of button you choose as well as the fly length you need to get into the skirt). Attach the buttons by hand. They should sit on the fly shield near to the seam attaching it to the skirt. Tack the fly shield to fly either invisibly by hand or by topstitching just the bottom of the fly as I have.

Hems

I find that shirt hems can be a finicky task, but with seam tape (Steam a Seam) they are so easy. I wouldn’t use this technique on a super delicate fabric since it adds glue into the seam, but otherwise its a great alternative. Iron on 1/4″ wide tape, and with the paper still on press the 1/4″ up and in again. The paper helps create an edge to use as a guide while pressing. Now peel the paper out and press one last time. Stitch hem.

I wanted the skirt hem to be invisible, and with wool it is simple to do and totally invisible! I used a hem-stitch. Take a stitch through the hem, but just a tiny thread from the skirt before coming back up through the hem. Pull the stitch through, but not all the way–leave a small loop. Once you have made it around the whole hem, pull the hem out a bit, sinking the loops into the fabric. As you can see it creates a sort of cross stitch inside the hem that floats slightly away from the skirt.

Shirt Yoke & Collar

Trace your seam allowances on the lower edges of the yokes and press along the lines. Trim to 1/4″. Pin in place on the front and back, and edge stitch along bottom edges. Baste along shoulders, neck and armhole edges.

Trim 1/16″-1/8″ off outer edges of under collar (this will be the un-interfaced one). This will allow the collar to fold over nicely. Trace your sewing line on with chalk; I find this helps to get sharper corners. Another tip for achieving sharper corners is to take a single stitch diagonally across the point. It seems like it would do the opposite, but this one stitch gives the seam allowance room to fold into a point, rather than stretching and making a rounder point. I also trace my seam allowance onto the collar stand, especially at the center front marking. Match the collar edge up with the center front marking exactly.

Inspiration No. 18: Pocket Primer

Pocket Primer: The Ins and Outs of Pockets

by Kathryn Brenne

Kathrynhandinpocket

To see a list of all sewing tutorials, click here!

pocketdisplay

A well turned out pocket is a useful detail that can add both function and beauty to your garment. It can be hidden or make a statement. It can hold small items or give your hands a place to rest.

Pockets can be divided into the following types: patch, inseam and welt. Our pocket primer covers a variety of techniques to help you obtain professional results for every style as well as suggestions for drafting your own pockets.

Inseam Pockets

Side Seam Pocket

inseampocketThis nearly invisible pocket is often used in the side seam of skirts, pants and coats.

1. Fuse a 1” strip of lightweight fusible interfacing to the wrong side of the garment in the pocket opening area. Pink outer edge of interfacing strips to prevent show through.

P1040906b

2. Cut a set of 2 pocket bags. Trim 3/8” away from the Front pocket bag.

P1040907b

3. Attach the Front pocket bag to the Front garment piece with a 1/4” seam allowance.

P1040908b

Press the seam towards the pocket bag. Edge stitch.

P1040909b

4. Attach the Back pocket bag to the Back garment piece only in the pocket opening area using a 5/8” seam allowance.

P1040910b

5. Join the Front and Back garment pieces together along the side seam above and below the pocket opening using a 5/8” seam allowance. Keep the top and bottom of the Back pocket bag out of the way by folding back on itself.

P1040911b

6. Press the seam open. The Front pocket bag will fold towards the Front.  Press the Back pocket bag and the Back open first before pressing it towards the Front.

P1040913b

This photo shows the wrong side

7. With the pocket open, edge stitch the Front pocket opening. Leave long thread tails and then use them to square off the end of the stitching.  Take them between the layers and knot them off.

P1040914b

8. Pin pocket bags together. Don’t worry if the edges do not line up. It is more important that the pocket opening is laying flat. Stitch pocket bags together.

P1040915b

9. The inside of the Front pocket opening with seam is flat and hidden inside of the pocket.

P1040916b

The folded edge of the Front should sit nicely into the well of the seam.

P1040917b

10. Trim away any excess seam allowance from the pocket bag. Finish stitching the Back pocket bag for the short bit above and below the pocket opening to the seam allowance.

P1040918bP1040919b

Invisible Zippered Inseam Pocket

zipperpocket

Vogue 1564 modified with an inseam invisible zipper pocket.

This useful and attractive secure pocket that can be added to ready to wear as well as to garments you are constructing. By adding an invisible zipper after the seam is sewn you avoid the lumpy bit at the end of the zipper, which is always difficult to sew when closing the seam after inserting the zipper.


1. Fuse a 1” strip of lightweight fusible interfacing to the wrong side of the garment. Pink outer edge of interfacing strips to prevent show through.P1040891b

2. Sew the Front and Back garment sections together along the side seams with a 5/8” seam allowance above and below the pocket opening.

P1040892b

Press the seam open.

P1040893b

3. Attach one side of the invisible zipper to the seam allowance. Position the coil teeth along the pressed fold line. The zipper tape that extends above and below the pocket opening should be positioned just to the outside edge of the seam.

P1040894b

Stitch using an invisible zipper foot.

P1040895b

As you come to the end of the zipper, which has now extended beyond the pocket opening, make sure the coil sits towards the outside of the seam allowance.

P1040896b

Align the second side of the zipper and stitch in the same manner. As you near the end, position the coil towards the outside of the seam allowance.

P1040897b

4. Pull up the zipper pull. This can take a bit of patience the first time to get it up into the pocket opening but you will never have to work at it again. The invisible zipper will open and close in the pocket opening only.

P1040898b

The wrong side of the zipper lays nice and flat.

P1040899b

5. Sew the Back pocket bag to the seam allowance only catching in the invisible zipper tape. It is helpful to use a zipper foot to do this.

P1040900b

Trim 3/8” off of the Front pocket bag.

P1040901b

Attach the Front pocket bag to the seam allowance.

P1040902b

Press the pocket bags towards the Front. Pin the pocket bags together ensuring they lay flat.

P1040903b

Stitch.

6. The finished pocket has a secure invisible zipper.

P1040904bP1040905b

Front and back Western Pockets

denimpockets

For instructions for this type of pocket, suitable for denim jeans, see our Perfect Jeans article.

Patch Pockets

Couture Patch Pocket

couturepatch

Design by British couturier Jon Moore. Sewn by Kathryn Brenne. Couture patch pocket.

This patch pocket is often found on jackets. It has a curved lower edge, which can be difficult to turn under. Follow these tips to achieve perfectly matched curved corners. If you are having difficulty turning under the edges of a square corner pocket or a back jean pocket try using this template technique. A Couture Patch Pocket should look like it is floating. It should not look ‘nailed down’.

1. Cut 1 patch pocket in wool, 1 hair canvas, 1 square of lining and 1 piece of lining selvedge 3/8” wide by the width of the pocket, to be used as a thin stay tape.

2. Thread trace wool pocket.

IMG_2040b

3. Place hair canvas on wrong side of wool. Stab-stitch along basting lines from right side of the fabric.

IMG_4098b

Pin stay tape (lining selvage) along facing fold line. Stab-stitch in place working from the right side of fabric.

IMG_4103b

shown on wrong side

4. Use a cardboard template to press in pocket edges. To create a template photocopy pocket pattern piece. Glue the copy to a thin (cereal box) piece of cardboard. Cut out the template with no seam allowances. Place the template on the prepared fabric. Use the tip of the iron to fold the seam allowances over the template. Fold in the edges first before turning down the facing. Press lightly, then remove the template and press again.

IMG_4093bIMG_4094b

5. Trim the seam allowances to 1/2”. Use pinking shears to trim the curved corners slightly narrower.

6. Working from the right side of the pocket, baste close to the edge to hold seam allowances in place.

IMG_4106b

IMG_4105b

7. Loosely catch stitch seam allowance around pocket, making sure to only catch the hair canvas.

IMG_4107bIMG_4108b

8. Baste pocket facing in place. Tuck in sides of pocket facing so they will not show.

IMG_4109b

9. Slip-stitch sides of pocket facing just back from the edge of pocket.

IMG_4110b

10. Hem-stitch the facing to the hair canvas only.

IMG_4111bIMG_4113b

11. Create a template for the lining that is 1/8” smaller around the outer edges than the pocket. Press in lining seam allowances using the cardboard template. Trim seam allowances to 1/2”. Pink around the curves.

12. Baste lining seam allowances.

IMG_4114b

13. Pin in place on wrong side of pocket.

IMG_4115b

Slip stitch lining to pocket.IMG_4116b

14. Pin pocket in place on garment. Slip-stitch pocket to the garment, starting 1/4” in along the top edge. These few extra stitches along the top edge of the pocket add reinforcement. Position stitching just to the underside of the pocket edge so it appears to be floating on the garment.IMG_4120bIMG_4119b

Other options:

Option 1: Fusible interfacing could be used instead of hair canvas for a ready to wear finish.

Option 2: The pocket can be basted in place and working from the wrong side of the garment use a small catch stitch to sew the pocket to the garment.

IMG_4213bIMG_4216b

Option 3: If desired, the pocket could be topstitched at 1/4 – 1/2” after step 14. The topstitching is only for decoration. Once complete the pocket can still be hand stitched to the garment.

IMG_4211bIMG_4212b

Option 4: Instead of hand stitching the pocket to the garment, the pocket could be machine edge stitched.

IMG_4210b

Bellows Pocket

bellowspockets

Coat with bellows pocket, flap and snap closure purchased in Paris 15 years ago.

The bellows pocket is perfect for activewear. It gives depth to a patch pocket allowing you to stash more items. The silhouette can be used as a fashion statement too. For drafting instructions see directions at the end of the article.


1. Chalk the fold lines and seam allowances onto pocket.P1040850b

2. Press along the chalked lines, turning seam allowances under.

P1040852b

3. Fold the bottom corners and stitch with a 3/8” seam allowance. Press the seam allowance to one side.

P1040856bP1040857b

4. Turn under a 1/4” seam allowance along top edge of pocket. Pin the facing in place and top stitch. Fold the sides of the facing in forming a little pleat. Press.

P1040858b

5. Chalk the pocket placement on garment. The size of the pocket is the front of the pocket without the side or bottom extensions.

P1040859b

6. Pin the sides of the pocket to the chalked lines.

P1040860b

Edge stitch.P1040861b

Pin the bottom edge in place and edge stitch.

P1040863bP1040864b

7. Take 3 stitches across the top of the pocket and with the pleat from step 4 pinned in place, edge stitch the pocket through all layers ending stitching at the facing.

P1040865b

Finished pocket.  (White thread used just for clarity in tutorial.)

P1040867b

Option:

Depending on the type of fabric used, you may want to edge stitch the folded lines of the bellows. This can be done after step 3.

Welt Pockets

Simple Single Welt Pocket

singleweltexampleThis classic pocket is suitable for pants and jackets.

1. Fuse a rectangle of lightweight fusible interfacing to the wrong side of the fabric where you want your pocket to be. Cut the pocket bag extra long from self fabric. Fuse a strip of 4” x 8” interfacing to the upper part of the pocket bag. This will become the welt.

2. Place pocket bag over welt area right sides together. Chalk the welt outline 6 1/4” long x 1/2” wide. Stitch around the outline, decreasing the stitch length to 1.5 in the corners to prevent fraying. Be precise with your stitching as this will determine the success of the finished welt pocket.

IMG_4169b

3. Cut through the center of the welt and V into the corners.

IMG_4170b

4. Turn through and press the upper edge and sides. Fold up the lining to form a welt. Take care to ensure that the width of the welt is uniform and fills the opening.

IMG_4171b

5. Stitch the corner triangles from the wrong side.

IMG_4172b

6. Working from the right side, stitch in the ditch along the bottom edge of the welt. (Contrast thread for demonstration purposes only!)IMG_4174b

7. Fold the pocket bag up and stitch the sides, catching in the welt and triangles.

IMG_4176b

P1040943b

Inside of pocket before pocket bag is finished.

Fold pocket bag up.

P1040944b

Pin pocket bag in place.

P1040945b

Stitch in the well of the upper seam allowance.

P1040947b

Once the top of the pocket bag has been secured stitch the sides and trim any excess from the top of the pocket bag.

P1040948bP1040949b

P1040950b

Finished single welt.

P1040969b

Double Welt Pocket

doubleweltDouble Welt Pockets are suitable for back pockets and jackets. They have a reputation for being one of the most difficult pockets to sew. Take your time, mark and stitch accurately.

1. Fuse a rectangle of lightweight fusible interfacing to the wrong side of the fabric. Cut 2 lengthwise strips 1” x 8” of self fabric and fuse with interfacing. Be precise cutting the welts.

2. Chalk a rectangle 6 1/4” x 1/2” onto the garment. Stitch around outline, decreasing stitch length to 1.5 mm around the corners to prevent fraying. Be very precise as this will determine the size and shape of the finished pocket. I like to begin stitching in the center of one of the long sides rather than at a corner.

IMG_4152b

3. Press welts in half, wrong sides together. Pin in place against the right side of the fabric. Line up raw edges with the center of the welt outline. Stitch in place, ending exactly at corners. Do not stitch across the short ends.

IMG_4154bIMG_4155b

4. Cut welt opening down the center and V into the corners.

IMG_4156bIMG_4157b

5. Turn through and press.

6. Stitch across short ends of welt from the wrong side, catching in the triangles.

IMG_4158b

7. Attach pocket bag to lower welt first, within the seam allowance. Fold pocket bag up and stitch to upper welt in same manner.

missingphoto

8. Stitch sides of pocket bag, catching in welts and triangles again.

P1040826b

Finished double welt.

P1040843b

9. To keep everything in place while the remainder of the garment is sewn, catch stitch the opening closed.

P1040827b

Other Options: Suit jackets often have a flap inserted into a double welt pocket. To create the flap follow these directions:

1. Trim 1/16” off of the outer edges of the flap lining.P1040832b

2. Sew the flap and lining together, easing in the flap to meet up with the slightly trimmed lining. Use pinking shears to pink the corners.

P1040834b

Turn right side out. Use a pressing template to press corners.

P1040836b

3. Baste upper edge of flap and lining together.

P1040837b

4. Chalk a placement line along the top edge of the flap. Insert flap into double welt pocket opening.

P1040838b

Pin to hold.

P1040839b

Sew flap to the seam allowance of the welt.

P1040840b

Return to step 7 of double welt instructions to attach the pocket bag.

Finished double welt with flap.

P1040844bP1040842b

Exposed Zipper Pocket

P1040975bThis is a useful zipper for keeping items secure. It is a flat pocket whose set up similar to a double welt pocket. Rather than attaching welts a zipper is inserted.


1. Fuse interfacing to the wrong side of the garment fabric in the pocket area.

P1040868b

2. Cut a facing 2” wide by 8” long. Pin to the pocket area. Chalk an opening 3/8” wide by 7” or the length of the zipper.

P1040869b

3. Stitch around the chalk line. I like to begin on a side rather than in a corner. Instead of backstitching, I overlap a few stitches once I have come to the beginning.

P1040870b

4. Cut down the center and V into the ends.

P1040871b

5. To help with pressing, I like to use the edge of the iron to press the edges of the facing towards the center.

P1040872b

Turn facing through to the wrong side and press. The rectangular shaped opening should be perfectly shaped.

P1040873b

6. Apply double sided Wonder Tape to each edge of the zipper tape.

P1040874b

Position the zipper in the opening taking care to ensure it is straight.

P1040875b

7. Edge stitch around the opening. As you approach the zipper pull, stop with the needle in the down position, raise the presser foot and open the zipper.

P1040876bP1040877b

Once the end of the opening has been stitched, stop again and close the zipper.

P1040878b

Do not back stitch. Instead leave long thread tails, pull them between the layers and knot off.

P1040879b

The zipper is now attached to the opening.

P1040880b

8. Attach pocket bag right sides together with lower edge of facing.

P1040881b

This is like the photo above, with the pocket bag laying on top of the zipper area.

Keeping the garment out of the way, stitch in the well of the seam.

P1040882b

Press pocket bag downward.

P1040883b

Bring other side of pocket bag up to meet the top of the facing.

P1040884b

Stitch across the triangular ends of the pocket.

P1040886b

Finished pocket bag

P1040887b

Finished zippered pocket.

P1040888b

Double Cloth Reversible Patch/Welt Pocket

reversiblepocket

Double cloth coat with patch and double welt pocket. This fabric was bonded together so I trimmed all raw edges with self made bias binding.

This pocket is suitable for a reversible garment made with a double cloth fabric. The technique used to create the welt portion of this pocket is the piped welt.  The seam allowance fills the welts in this pocket style.


1. Cut a patch pocket with a 3/8” seam allowance. Thread trace the seam allowance catching only one layer of the double-faced wool.  Thread trace a second line another 3/8” in from first line of basting. This time going through both layers.

IMG_4122bIMG_4123b

2. Tear the layers apart stopping at the second line of basting. Gently pull on the layers and carefully clip threads holding the two layers together. Press the pocket flat.

IMG_4124b

3. Tuck the seam allowance in on one layer of wool. Pin back the second layer of wool to match first. Baste it in place.

IMG_4126bIMG_4125b

4. Slip-stitch around the pocket. Machine topstitch the patch pocket opening edge only.

IMG_4127bIMG_4128bIMG_4130bIMG_4131b

5. Trace a welt window on the garment 1.5” wide by 6 1/4” long. Stitch around the marked opening.

IMG_4132bIMG_4133b

6. Cut down the center of the opening and V into the corners. Trim to 1/2” seam allowance.

IMG_4134bIMG_4135b

7. Cut two strips 3” wide by 8” long. Chalk 1/2” along one edge of the welts. Fold the welt to that line. Press the fold line. Baste.

IMG_4136b

8. Stitch the welts to patch side of garment, lining up the shorter edge of the welt with the raw edge of the window. Turn the welts through and stitch across the ends catching in the triangles.

IMG_4137bIMG_4139bIMG_4140bIMG_4141b

9. Separate the layers of the welt seam allowance up until the stitching. Trim the under layer to a scant 1/4”. Turn the outer edges in, tucking them under the trimmed seam allowance. Edge stitch around welt.

IMG_4143bIMG_4145bIMG_4146bIMG_4204bIMG_4205b

10. Cross-stitch the welts together. From the wrong side of the welt, pin the patch pocket onto the garment, covering welt entirely.

IMG_4206b

Either slip stitch the patch in place for an invisible look, or edge-stitch (this will show on

the other side of garment).

IMG_4207bIMG_4208bIMG_4209b

reversiblepocketbinding

Reversible Bias Bound Welt/Patch Pocket
The fabric used in my reversible coat was a double cloth with the layers fused together rather than woven together so they did not peel apart as easily. For this sample I used the same technique as described but rather than peeling the layers
apart, I used bias binding to bind the edges of the patch pocket and the seam allowances of the welt. The rounded corners of the patch pocket were easy to bind. I overlapped the binding at the inside corner. To bind the welt seam allowances I mitered the corners. After the binding was attached to the welt seam allowances I edge stitched the outer edge of the binding to the garment. Once the patch pocket was bound it too was edge stitched to the garment.

Shaped Welt Pocket

A shaped welt pocket can add an element of fun to a garment. Triangles, circles, odd shaped rectangles are all possibilities for a shaped welt pocket. This technique is called the organza patch technique for making welt pockets. I have used this technique to create an odd shaped pocket, but the same technique could be used to make a double welt pocket.

1. Fuse a rectangle of lightweight fusible interfacing onto the wrong side of the fabric, a little larger than the opening.

P1040920b

2. Chalk the pocket shape onto the right side of the fabric.

P1040922b

3. Lay a piece of silk organza over the chalked shape.

P1040926b

Stitch around the chalked shape, which is visible through the organza.

P1040927b

Trim close to the stitching and clip into the corners.

P1040928b

Press the edges of the silk organza in towards the center of the shape.

P1040929b

Turn the organza through the opening and press, rolling the organza slightly towards the wrong side.

P1040930bP1040931b

4. Interface two welts. Cut the welts big enough for the irregular shaped opening.

P1040932b

Press in half. Align the welts in the pocket opening. Catch stitch the two welts

together. Pin in place.

P1040935b

Edge stitch around the opening.

P1040936bP1040937b

5. Attach the pocket bag to the edge of the lower welt.

P1040938b

Fold the pocket bag up and attach it to edge of the upper welt. Stitch the sides of pocket bag.

P1040939b

Finished pocket.

P1040940b

Drafting Your Own Pockets

Most pocket openings need to be 6-7” to accommodate the hand, but some pockets are smaller and shallower, allowing only a couple of fingers enough space to retrieve an item. My shaped welt pocket had a 6” opening from the tip of the triangle across to the center of the wide edge.

Pockets can be added to ready to wear garments. For instance, you can unpick a seam and use the invisible zipper inseam technique.  Draft a pocket bag pattern and use a coordinating fabric to finish your pocket.

To draft the bellows pocket:

1. Begin with a rectangle 6 1/2” x 8”.

P1040845b

2. Determine how deep you want the bellows to be. For this sample I added 1” to the edges of the rectangle along the sides and bottom. I added a 1” hem allowance to the top edge. Whatever dimensions you choose, add a 1/2” seam allowance to the outer three edges and a 1/4” seam allowance to the hem facing.
P1040849b

3. In the two bottom corners, square off a 3/8” seam allowance.

P1040847bP1040848b

4. Finished pocket pattern

P1040951b

To draft a pocket flap:

P1040829b

1. Draft a rectangle the length of the welt opening by the desired width. My sample was a finished width of 1 3/4”.

2. Use a template to draw curves on the lower corners of the flap. I used a metal pocket template.

3. Add a 3/8” seam allowance to the outer edges. This makes it easier to keep a nice curve around the corners as you sew. Add a 1/2” seam allowance to the top edge, which leaves some room for adjustment when placing the flap in the welts.

Cool Cable Cardigan

By Kathryn Brenne

To see a list of all sewing tutorials, click here!

On a recent trip to London I fell in love with a high couture knit jacket. When I came across this beautiful quilted cable knit fabric I decided to make my own variation using the jacket I had seen as inspiration.

P1040701P1040708P1040709P1040711

inspo 3

Inspiration garment

It is perfect for crisp spring or fall days but also works well in air-conditioned rooms during the summer. A perfect weight to layer easily over other garments, it looks great with jeans, trousers, skirts or as a topper over a dress. I have teamed it up with a matching T-shirt and have been wearing it casually with jeans. I can see that this jacket is going to see a lot of wear!

(For more photos, scroll down to the bottom of the article!)

Fabric

I used 1 1/2 yards of the quilted cable matelasse’ knit in the denim color. (It also comes in seagrass and black. Creamy white and light gray heather will be available soon as well.)  I cut the pattern crosswise to allow the cables on the fabric to run lengthwise. The fabric has enough stretch and seaming so that it is not a problem to use the fabric on the cross grain.

fabricphoto

Fabric #66437#66436, #66435

For the contrasting sections I used 11 oz. rayon jersey in slate blue (now sold out, no longer available—see special note at the bottom of this section), which matched so well that I made a coordinating T-shirt to wear underneath the jacket. In total I used 2.5 yards of the 11 oz. jersey, to complete all the contrast sections plus the T-shirt. If you use a thicker knit for contrast (a ponte for instance), you can skip some of the doubling and interfacing steps described below. You can also make the entire jacket from the cable knit.

Front, upper back, mid back and upper sleeves were cut from the cable knit fabric.  All other pieces were cut from a double layer of rayon jersey. All of the contrast pieces were cut double and interfaced with a bias knit interfacing in black. **Make sure
to choose an interfacing that will not fray as this garment is constructed with all raw edges.** The interfacing added a bit of structure to the thinner 11 oz.
rayon jersey making it more compatible with the thicker cable knit fabric.

SPECIAL NOTE: Please contact us for more information regarding coordinating fabrics for these cable knits. Fabrics are sometimes discontinued but there’s always another option!

Pattern

Steffi pattern

Style Arc Steffi Jacket

I chose a pattern that was similar to my inspiration garment. The Steffi Jacket from StyleArc was the perfect choice as it had similar seaming and required only a few changes:

1. I redrew the CF into a curved hem and omitted the zipper.

2. I wanted to add a band around the neckline instead of the collar. To do this I cut the jacket using the original pattern. Once the jacket was assembled I draped the
garment on my dress form and marked a new finished neckline. From the finished
neckline, I drafted a 1 1/4” wide band and added seam allowances.

3. I also added a band 1 1/4″ wide to CF. There is no overlap; the bands are intended to just meet at CF. I extended the bands to end at the bottom of the back flounce.

4. I straightened the sleeve hem and add a 1 1/4″ band to match the neck and CF bands.

5. I replaced the lower back panel with a long rectangle that was slashed and spread along the bottom edge to create a more flared back panel. To create the lower back panel I measured the length of the seam and cut a rectangle pattern piece 6” wide. I slashed the
rectangle at CB and then again 5” either side of CB. I spread these three slashes 3” each, which turned my rectangle into more of a U shape. When the U shape is sewn to the lower back edge it creates a flounce.

6. I also added a flat separate band (also 1 1/4″ wide) between the upper and mid back panels. This band was sewn into the seam and left loose. It helps to break up the pattern between the upper and middle back panels.

[Photos of pattern pieces coming soon.]

Layout and Cutting

IMG_3982.jpg
The pattern was cut on the crosswise grain so the cables would run vertically. Most pieces didn’t require matching since they were separated by a contrast panel. The only pieces that were matched were the upper back, mid back and upper sleeve. I also made sure that both front panels were mirror images of each other. To do so I had to cut them in opposite directions:
IMG_3985

Needles, Thread and Notions

3 x polyester Guttermann thread in color 239
1 x Aurifil Cotton Mako 12 weight top stitching thread in Color 1248
Cotton basting thread
5 x Elan silver hook sets approximately 1 1/2” across by 1/2” wide
Ballpoint size 70 machine needles were used in the coverstitch machine
Buttonhole spacing gauge

Fusing

IMG_3986

Elna press

Since there was so much fusing for this project, I fused everything using an Elna Press, which gives a very strong bond and covers more area at once, making the job quicker.
Alternatively, an iron can be used.

To create a good bond follow these steps:
1.  Warm the fabric first with the iron.
2.  Position the fusing. Use a lift and press motion rather than a gliding motion to fuse the
interfacing. Holding the iron in one place for approximately 15-18 seconds should create a good bond.
3.  Turn the fabric over to the right side and press again. This will draw the glue into the fabric creating a permanent bond.

Stitching

I used a coverstitch machine to sew all the seams on this garment, but if you don’t have one, this project would be a great opportunity to experiment with decorative stitches in your sewing machine library.
To achieve this seam, I used all 3 needles on the coverstitch machine, and a fancy thread in the looper. The heavier thread in the looper created a stitch that matched the cables of the fabric very well.

stitching
The stitching is all done from the wrong side of the garment, so it is essential to baste all seams accurately. The basting is used as a guideline on the wrong side of the garment to help keep stitching straight when you cannot see what is happening on the right side of the garment. Practice the technique first.

I used a maximum stitch length of 4mm and pulled on the fabric slightly as I fed it into the coverstitch machine. The longer stitch length and technique of pulling on the fabric slightly built more give into the stitch, which gave it greater stretch. This was particularly critical in areas that required a lot of stretch such as the neckline and hems of the Tshirt as well as the sleeves of the jacket.

Experiment with decorative stitches in your stitch library using a heavier thread. Depending on the thickness of the thread used, you may need a top stitching needle. Try lengthening stitches to accommodate the thicker thread. Choose stitches which are not too dense.

Seaming

Thread trace stitching lines on all pieces cut from cable knit fabric, as well as inside layer of the contrast pieces.

IMG_4017

Lay inner contrast piece over wrong side of cable knit piece, lining up seam lines. Baste 1/8” away (in yellow).

IMG_4019IMG_4020
Cut seam allowance off vertical seam of outer contrast layer and lay on top of right side of cable knit, lining up raw edge with original seam line of basting. Baste in place close to raw edge, being very accurate as this will become your sewing guideline. Remove all other basting.

IMG_4021IMG_4022

On wrong side, coverstitch seam following the basting thread by positioning it between the first and second needle. This worked well on my coverstitch machine. Practice a sample first on your machine to determine spacing. Remove basting and press.

IMG_4024IMG_4025
Wrong side up when coverstitching:

IMG_4001
Right side:

IMG_4002

On wrong side trim away seam allowance of contrast using applique scissors.

IMG_4027

Open up layers of contrast panels and carefully trim away cable knit as close to stitching as possible to reduce bulk.

IMG_4028IMG_4029

Most seams are done using this method, exclusive of shoulder seams on neck band and upper and lower under sleeve panel seams, which are lapped separately.

Cut seam allowance off along lower edge of upper under sleeve panel. Lap over lower under sleeve panel. Baste close to raw edge. Coverstitch from wrong side. Do this to both inner and outer contrast under sleeve sections separately.

IMG_4005

Bands

Baste both layers of upper back band wrong sides together, along lower seam line. From
wrong side, coverstitch. Trim close to stitching.

IMG_3998

Lay underside of upper back band behind upper back panel. Baste. Lay mid back panel along same seam and baste. Serge or zig zag seam down to 1/4” wide.

IMG_4008IMG_4011

Trim off seam allowance on upper edge of upper back band.

IMG_4010

Trim cable knit seam allowance. Baste band down along seam line. Coverstitch from wrong side, through all layers.

IMG_4012

upperbackband

Finished upper back band

Attach front bands using seaming technique described above. Chalk exactly 1 1/8” away from raw edge. Baste along chalk line. Turn to wrong side and coverstitch. From right side trim close to stitching. Be extra careful to cut smoothly since this will remain a raw edge and will be the CF of the jacket.


IMG_4013

Lap shoulder seams on neck band. Coverstitch seam. Chalk seam allowance on neck band, and remove coverstitching to within chalk marks. Tie off threads. Attach neck bands using the same technique as the front bands.

IMG_4014IMG_4015IMG_4016

Sleeve

The sleeve can be tricky as it has to be turned through a skinny panel in order to achieve this type of seaming. The sleeve is wide enough to accomplish this technique. The stretchy fabric also helps.
One seam on the sleeve is done exactly as all the other seams, but the second seam has to
turn through the contrast panel in order to access the seam and trim the cable knit seam
allowance down. This is done after the second seam of the sleeve has been sewn. The seam can be accessed through the underarm area.

IMG_4006

Construction Sequence

1. Assemble body and attach sleeves
2. Attach lower back flounce
3. Attach front bands
4. Attach neck band

Closure

Try on the garment and mark bust on the front band. One closure should sit at the bust to prevent the garment from gaping. Mark the center of the neckband.

Use a metal buttonhole spacing guide to mark 5 closure placements. The spacing guide should align with the neck and bust markings with one more marking between these two and two below the bust.
P1030701

The closures should be positioned so that the edges of the front band meet but do not overlap when closed.
P1030707

Chalk the position of each closure.

P1030703

Use a buttonhole stitch and the same Aurifil thread to attach the closures to the front band. I used 10 buttonhole stitches per closure.

IMG_8898IMG_8898 2P1030705

T-shirt

P1040713

I used my favorite basic T-shirt pattern, Ce Podolak’s Material Things Fearless T-shirt #109 to create a coordinate to wear with the jacket.

teepattern

I sewed the shoulder seams first and then tried the T-shirt on with the jacket to see how the two necklines would sit. I wanted the T-shirt to be exposed and sit slightly higher than the jacket neckline.

To create the same raw edge style that was used on the jacket, cut the neckband with no seam allowance 1 1/8” wide. Lap the raw edges of the neckband over the raw edge of the neckline. Baste close to the raw edges of the band. Coverstitch from the wrong side pulling on the neckband as you stitch.

teeneckcloseup
Attach the sleeves.

Try the garment on and pin the side seams and sleeves to fit. I found the rayon jersey was quite stretchy. Pinning the side seams after the neck and sleeves were finished allowed me to pin the fabric in slightly from the regular stitching line for a closer fit.

Fold the hems of the T-shirt and sleeves to the outside of the garment. By doing so, this
creates a raw edge to match the raw edge finish of the jacket. I left a 1 1/4” hem allowance on the hem of the T-shirt and a 3/4” hem allowance on the sleeve. Baste. Position the basting 1/8” back from the raw edge and aligned this with the first needle on the coverstitch machine.

teehemcloseup

P1040703P1030708P1030710P1030712P1030713

P1040705

Inspiration No. 16: Linen Love

Linen Love

by Kathryn Brenne

To see a list of all sewing tutorials, click here!

Linen is a wonderful fiber to wear in the summer months. It is cool, absorbent and breathable, and has a casual, breezy look.  I wanted to make a linen dress for myself, using the medium weight cross dyed driftwood/tan linen , and to add interest I decided to create my own eyelet lace border. Using tone on tone embroidery thread, and a new technique, I was able to create a border design that gave this simple linen dress a sophisticated appeal, and was a lot of fun to do!

kathryn3views


ondressform

Pattern

voguepattern

Vogue V8970

Simple lines and an easy fit are best when working with linen. In general linen tends to be a looser weave, which can cause the fibers to separate under stress. I chose Vogue V8970, a simple raglan sleeve dress with front pleats, back darts, side seam pockets, collar and button front closing. It has a loose, roomy fit.


I lengthened view A, which has double pleats in the front and a fuller skirt, by 8”.  This worked well for my frame since I am 5’9” tall.  I wanted a below knee length dress with the eyelet border positioned above a narrow hem. The hem allowance was reduced to 5/8”, which made the hem on a full slightly circular skirt easier to manage.

Instead of creating box pleats for the front of the dress, I pressed the pleats flat and then
towards the side seams. This created pleats with tucks pointing inward giving a more slimming look. No pattern alteration was needed for this — it is merely a pressing technique.boxpleats
I waited to finish the inner edge of the front facing until the embroidery was complete. I didn’t want the facing to show through the embroidery eyelets. Depending on the embroidery placement and the size of garment being made, the facing could be finished narrower tapering back up to the pattern width through the waist area.

Fabric

linenfabricOne of the features of linen is its tendency to wrinkle. Pressing linen when it is wet can help to keep it crisp but this feature is definitely part of the distinctive look of linen. Linen is a plant based fiber, and since it is a brittle fiber it is best stored rolled or hung.  Garments made from linen can develop permanent creases and actually wear out along the creases if they are stored folded.

I purchased 3 yards of linen, which was enough to cut a longer version of view A in size 12 and do a few test embroidery samples. I chose not to preshrink the linen but did press it.  You can prewash the linen as an alternative, to preshrink and soften it.  A web search will show just how much advice there is out there for pretreating linen, and I suggest that you study some of these suggestions and decide what works best for you.

I used a lightweight woven fusible interfacing #16510 for the collar and front facings.

Needles and Thread

For general construction I used a Universal size 70 needle.
For the machine embroidery I used a sharp size 75 needle.
Gutermann 100% polyester all purpose thread was used for construction.
Isacord 100% polyester embroidery thread in color 0874 was used for the machine embroidery.  It is important that the thread used for embroidery be 100% polyester.

Pressing

Linen stretches when wet. It is best to press the garment with a hot iron while slightly damp.  After completing the embroidery I washed the dress on a gentle machine wash. I put it in the dryer for a few minutes to take some of the moisture and wrinkles away and then pressed it dry with the iron.

Linen takes a press very well.  But because it is a brittle fiber, marks from alterations to parts of the garment that have been pressed maybe difficult to remove, so be sure to perfect your muslin before working with your linen, and check your work as you go to avoid mistakes that may leave marks on your fabric.

Finishing Seams

Since linen ravels easily, serged seams or French seams are perfect options. This medium weight linen would have been too thick for French seams, so serging was a quick and easy choice. It is easy to press the serged seams after the garment is complete and also after laundering.

Care

Linen machine washes very well. Tumble dry for a few minutes, hang for a short amount of time and then press while still damp.

Construction Tips and Techniques

For the most part I followed the pattern directions. The dress was completed other than
hemming before the embroidery was stitched.  Following is a description of the  techniques that were done differently than the pattern guide sheet.

Collar

Trim a scant 1/8” off of the under collar before beginning the collar.

img_3690.jpg
Interfacing was fused to the upper collar.
To stitch the corners perfectly, use a ruler to lightly pencil the stitching line onto the
interfacing at the corners.

img_3692.jpg
Stitch on the penciled line.

IMG_3695
Trim seam allowances to 1/4”.

img_3696.jpg
Turn the collar right side out and press, rolling the seam slightly towards the underside.
To edge stitch perfect corners, use an edge stitching foot and move the needle two
positions to the left. Stitch to the corner and remove the collar from the machine leaving long thread tails. Leave long thread tails at the beginning as you start stitching in the opposite direction. This prevents the corner stitch from looking slightly off or crooked. Take all thread tails through the corner stitch, unpicking one stitch if necessary. Tie off the four thread tails on the under collar. Thread the ends through a self threading needle. Feed the needle through a stitch. Pull ends tightly and the knot will disappear into the stitch. Clip thread tails.

IMG_3698bIMG_3700b
Once complete, the corner stitching should be perfectly sharp and square.

IMG_3702bIMG_3703c
After the front facing is attached, edge stitch the front and notch ending one stitch into the edge of the collar.
IMG_3889
The best stitch quality is always with the good side facing up. Stop and start your edge
stitching making sure the good side is facing up. Leave long thread tails and pull them to the wrong side. Knot off, thread into a self threading needle and bury the thread tails.
At the notch of the facing and collar, finish the last stitch by hand. One stitch can join the two rows of edge stitching together.

collarcloseup

Pockets

Fuse a strip of interfacing 1” wide by the length of the pocket opening to the front and back pocket openings before beginning the pocket construction. After attaching the pocket bags, edge-stitch the front to keep it in place.

IMG_3689

Embroidery

embroiderycloseup

I had been wanting to try Fiber Etch® for a while. Linen was the perfect choice to try this fiber remover. The product works best on linen or cotton. It must be used with 100% polyester or synthetic thread to prevent the sodium bisulfate from eating away other areas of the garment. Test this technique on a sample first.

fiberetch.jpg
I purchased a cutwork embroidery design from embroiderydesigns.com. The design I
purchased was a cutwork diamond FL749. I used tear away Floriani Wet N Gone water soluble stabilizer.

various

I tested out different colored threads before deciding on the sophisticated look of tone on tone embroidery.
IMG_7875b
From one of my test samples I learned that although the embroidery could stitch through two layers, the Fiber Etch® would not work on the synthetic fusible interfacing I had applied to the front facing.
P1030556b

After stitching out two designs side by side, I worked out the placement along the bottom of the skirt. I used pins to mark the placement area.

Attach the water soluble stabilizer to the back of the fabric to be embroidered using a
temporary spray adhesive. I hooped the fabric and the stabilizer using the grid that came with my hoop to center up my pin markings. I stitched out two motifs at a time before repositioning the hoop. After the embroidery was complete I carefully removed most of the water soluble stabilizer.

P1030559P1030557

Use an eye dropper to paint the eyelets of the cutwork embroidery being careful not to
accidentally drop any Fiber Etch® onto other areas of the garment.
IMG_3844IMG_3846

Use a hair dryer to dry the Fiber Etch® .

IMG_3847

Use the iron to press the motifs. Apply heat until the eyelets turn dark brown.

IMG_3851IMG_3852IMG_3854

The brown areas become brittle and are easily removed with an awl.

IMG_3859IMG_3860

On the seams, apply a bit of the Fiber Etch® to the wrong side of the embroidery.
After removing most of the stabilizer machine wash the garment on a gentle cycle with detergent to get rid of the remaining stabilizer. This also will clean up the eyelets nicely.

IMG_3861

Hem

The front skirt is full and ends up being on the bias by the time it gets to the side seam. Rather than easing linen into a 1 1/2” hem, which would be difficult to do, I chose to make a narrow hem, the same as for the sleeves.

To make a narrow hem, chalk a 5/8” hem allowance. Press up hem. Fold edge of hem allowance down to the fold and crease.
img_3874.jpg
Pin hem in place easing in fullness if needed.
img_3875.jpg

Baste narrow hem in place. Edge stitch close to the folded edge.

IMG_3882

Buttonholes

I enjoy making handworked buttonholes. There were nine buttonholes down the front of this dress.

Chalk the center of each horizontal buttonhole. If you were careful cutting out the fronts, the center of the buttonholes should lay perfectly on grain.

P1030566b

I used the rectangle bound buttonhole stitch on my machine to outline a narrow square ended buttonhole.  Reduce the stitch length to .6 mm and the width, which reduces the width of the rectangle,to 2 mm.  Apply a small bead of Fray Check down the center of the stitching. Let dry and then cut down the center.

P1030567

Work a buttonhole stitch using a double strand of Gutermann 100% polyester all purpose
sewing thread. I take three stitches across each end to create a square buttonhole.

IMG_8050

Good side of the buttonhole

IMG_8051

Wrong side of the buttonhole

Finishing

I found that the front of the dress pulled open a little bit due to the weight of the pleats. To keep it closed I made a self covered snap. This is a techniques I learned from British couturier Jon Moore.

Use an awl to put a small hole in a scrap of fabric.

P1030574b

Position the male portion of the snap through the hole.

P1030575b

Close the snap with the female portion. Trim the scrap to a circle.

P1030576b

With the snap still closed, sew a gathering stitch around the perimeter of the circle.

P1030577b

Pull up the gathering thread and oversew the back of the snap with a few stitches before
ending off.

P1030578bP1030579b

Repeat the process, this time using the finished side of the snap to close the other half of the snap.

P1030582b

Pull up the gathering thread.

P1030584b

Finished snap.

P1030585bP1030587b

Give the finished snap a press to flatten the back.

P1030586b

Sew the finished snap between the two waist buttons on the dress.

P1030590b

I used a very small catch stitch to sew the facing to the waist of the dress. Be careful to only pick up the tiniest thread; otherwise stitches will show through on the good side of the garment.

P1030589b