
Diving into Scuba
by Kathryn Brenne
To see a list of all sewing tutorials, click here!

Scuba/neoprene knit fabrics have become very popular in the past few years. Available in different weights and fiber contents, scuba/neoprene fabrics typically have a spongy feel similar to lightweight neoprene found in wetsuits but they are specifically made for womenswear. Most scuba/neoprene fabrics have a high content of polyester or nylon, but others can include rayon, cotton, wool, and almost all have lycra or spandex. Scuba has a doubleknit construction with varying amounts of stretch in both width and/or length but they are all quite stable. Because of its characteristics, it is best suited for simple, structured designs including dresses, jackets, skirts, leggings and jackets.
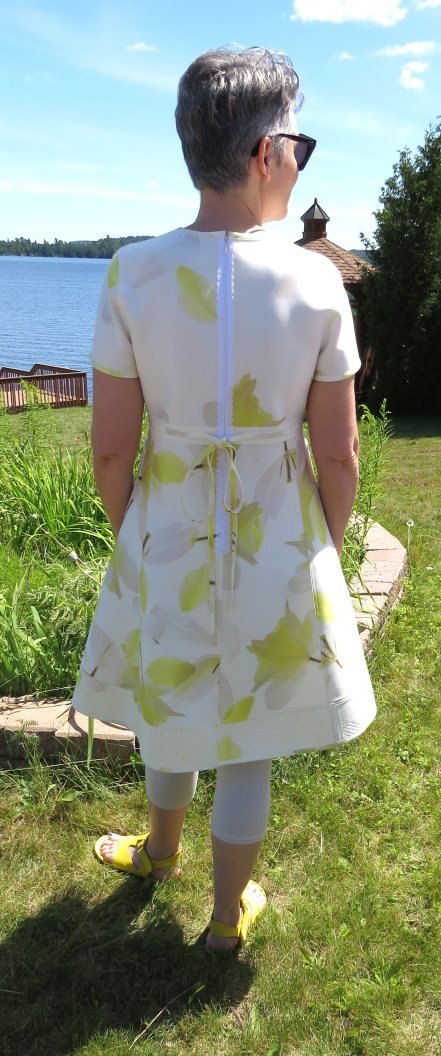
Linda was very excited when she found this Car0lina Herrera neoprene beauty and we felt it was perfect for this inspiration article. With several wedding-related events coming up, I chose to make a simple Ralph Rucci dress, V1404, which was perfectly suited to this beautiful fabric.
I chose V1404 because of its shape. The design is suitable for a fabric with some substance in order to maintain the shape of the skirt, and this scuba knit was the perfect choice. The finished garment has a smooth appearance and the skirt stands away nicely from the body. Scuba knit can be warm to wear but the short sleeve design has been quite comfortable in the heat of summer weather.
There are so many fun and interesting details in this dress pattern — pockets, tie belt and quilted hem band, and the combination of the fabric, print and design have created a winner. I can’t count the number of compliments I have received, and this has become my go-to summer dress!
[Linda’s note: scroll down past the photos for all the tips and techniques!]


Fabric Prep
Whenever working with a new fabric I always test a 6” swatch before deciding how to care for the fabric. I found that scuba knit is very easy to care for; simply toss it in the washing machine on a gentle cycle. I put it in the dryer for a couple of minutes to remove a few wrinkles and then hung it to dry. A light pressing and it was ready to go. There was no shrinkage or change to the fabric.
Layout and Cutting
This particular scuba knit had a large floral print concentrated down the center of the fabric. The edges of the fabric were mostly off white and since stretch of the fabric was very stable, it allowed me to cut it on the crosswise grain and position the flowers through the waist and skirt of the dress. I used the plain edges of the fabric to cut the upper body and hem band pattern pieces which made very good use of the fabric. I cut the entire dress in a size 12 from two yards of fabric.

I used a single layer layout for cutting. After cutting one pattern piece the pattern was flipped over to cut the other piece. The print was large and varied so no matching was necessary. I made sure that no spot or leaf was placed directly over the bust point, to avoid a bulls eye effect. I used a rotary cutter with a new blade and weights to cut the fabric.

Notions, Thread and Needles
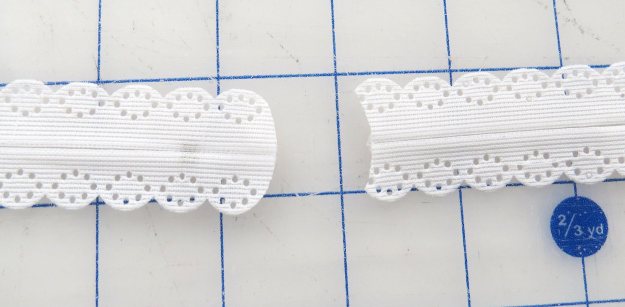
I had a pretty closed end white invisible zipper with lacy tape in my stash, which I used for the back closure. The pattern calls for a 22” zipper.
100% Polyester all purpose sewing thread is suitable for all construction. I used yellow thread, which matched the print but contrasted with the off white, to highlight all of the stitching and make it stand out.
A microtex size 70 needle was used throughout.
I used a hook and eye to close the top of the zipper.
Interfacing
No interfacing was used in this garment. The fabric is substantial on its own with limited stretch so no interfacing was required. All edges at the neck, sleeve and hem, which may have required interfacing, are finished with binding instead.
Machine Set Up
Straight stitching was used throughout for all of the construction. To obtain the best quality straight stitch, a straight stitch throat plate was used along with a 1/4” foot.

The needle can only be used in the center position but my foot has markings, which allow it to be matched up to edges as I am stitching. A stitch length of 3 mm highlights the stitching.
Pressing
Scuba knit can be pressed with an iron on a nylon setting. It the heat is too high, it may damage the fabric, so please test a sample to avoid problems. Steam can be used.
Techniques
Lapped Seams
Lapped seam construction is perfect for scuba knit and other non-raveling fabrics. Raw edges are exposed on the right side of the garment. I positioned the pattern pieces so that right Front overlapped left, left Back overlapped right, Side panel overlapped Front and Back, dress overlapped Hem Band and bodice overlapped sleeve.
To make a lapped seam remove the seam allowance from the overlapping garment piece. Chalk the 5/8” stitching line on the underlapping garment piece.

Pin the overlapping edge to the chalked stitching line of the underlapped section.

Baste the layers together.

Edge stitch and then topstitch the layers together. Topstitching is placed 1/4” away from edge stitching.

After lapped seams have been edge stitched and topstitched, use a pair of appliqué scissors to trim the underlap close to the stitching line (on the wrong side).

Darts
To sew a dart using lapped seam construction remove the seam allowance from the upper leg of the dart. Use a rotary cutter to get a nice straight, clean cut edge.

Then use a small, sharp scissors to cut all of the way to the tip of the dart.

Overlap and pin the upper edge of the dart to the stitching line of the underlap.

Stitch the dart all of the way to the tip.

Leave long thread tails, which can then be pulled to the inside of the garment and knotted off.

Weave the thread tails back into the stitching on the inside of the garment.

A small dab of Fray Check on the ends of the cut tails will prevent them from working their way out.

Trim the underlap to 1/4”.

Special note: The Front side seam of the bodice overlaps the Back bodice. The seam allowance on the Front at the side seam is removed. For this reason, stop stitching the dart a wide 5/8” back from the side seam. If you stitch to the end, the stitches will be cut when preparing the overlapping edge for the side seam.

Use a coordinating colored thread to hand sew the tip of the dart invisibly to the wrong side of the dress Front. The tip of the dart could be a weak point and this bit of extra stitching will reinforce the machine stitching.

Binding
To bind the neck, pocket, sleeve and hem bands, cut lengthwise strips of scuba knit 1 1/4” wide. Cut these close to the selvedge, not on it, as sometimes the selvedge can be a bit distorted. Using the pattern pieces as a guideline, cut lengths of binding for each edge allowing a little extra at the ends ‘just in case.’
Pin one edge of the binding 3/8” in from the raw edge of the fabric piece to be bound. Baste. Wrap the binding around the edge snuggly and pin to hold.
The binding should lay flat on the garment. Around the neck edge it should pull in just a bit to form a smooth round curve.
Edge stitch.
Use a pair of appliqué scissors to trim the back of the binding close to the stitching.
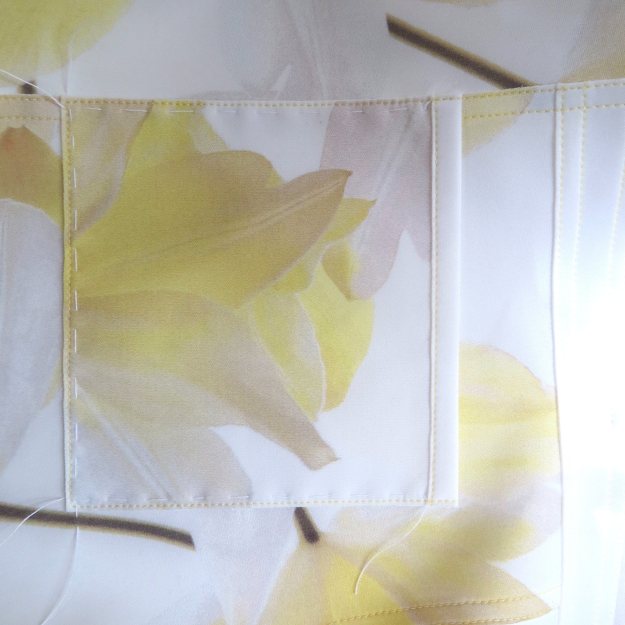
Side Panel and Pocket
Prepare the Side panel by attaching the waistband using lapped seam construction. Pin and baste the Side panel to the Front and Back of the garment.

Edge stitch and topstitch the Side panel.

Prepare the upper edge of the Pocket by attaching the Pocket binding. Wrap the binding around the top edge of the Pocket and edge stitch. Use appliqué scissors to trim the back of the binding close to the stitching.


Position Pocket onto Side panel at markings. Baste. Edge stitch and top stitch.
When beginning to stitch on a thick area of the garment, the machine will sometimes take several small stitches. To prevent this from happening use a height compensator. The height compensator can be placed behind the foot to bring it to the same level as the thick area. Once the machine begins stitching and is over the thick part, the height compensator can be removed.

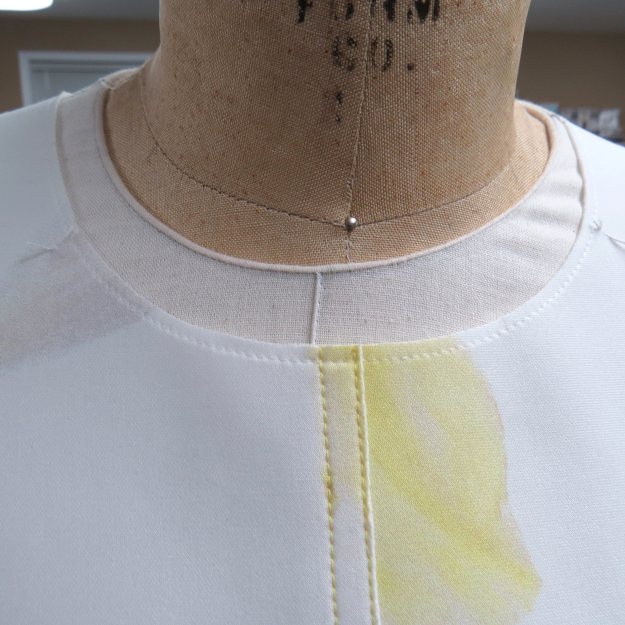
Neck Edge and Zipper
Remove the seam allowance from the neck edge after the shoulders have been sewn.

Stay stitch the neck edge 1/8” away from the cut edge.
Remove the seam allowance from the left Back garment.

Mark 21” down from the neck and remove an extra 1/4” from the left Back for the zipper. Remove the seam allowance from the right Back only in the zipper area.


As per previous instructions, lap the lower part of the Back seam.

My zipper had quite a bit of extra length beyond the zipper stop. I trimmed the excess away in a rounded shape, which matched the scalloped edge of the zipper tape.
Pin the zipper tape to the left Back opening, positioning the top of the zipper 3/8” from the cut neck edge.

On the inside of the garment the cut edge of the zipper opening will be positioned close to the zipper coil. Baste.

Pin and baste the other side of the zipper tape to the right Back paying particular attention when matching up the waistband from both sides of the Back.


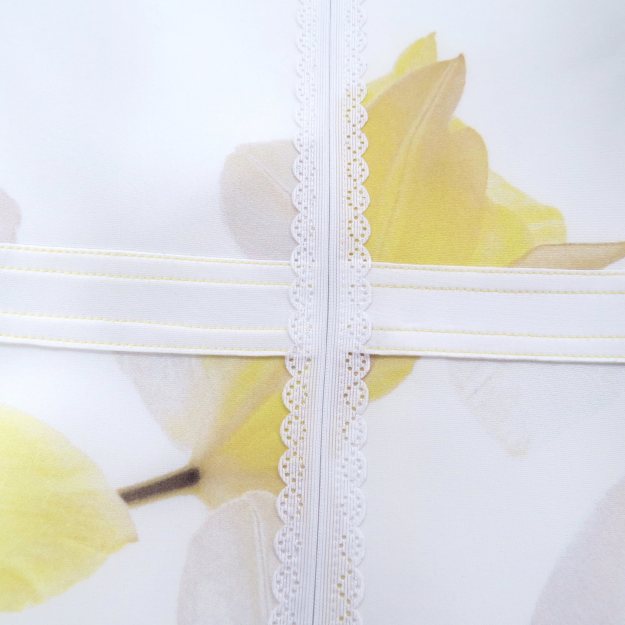
Once the zipper has been basted in place, close the zipper and check the position of the waistband to ensure that everything looks straight.


Attach the zipper to the garment with two rows of stitching. Where you position the rows of stitching will depend on the design of your zipper tape. Two rows of stitching side by side are stronger and more secure than two rows on top of each other. Try and position stitching on a solid portion of the lacy tape.

Neck Binding
Pin one edge of the neck binding to the neck edge. Leave 1/2” extending beyond the zipper. Fold this back on itself to give a nice clean finish to the ends of the neck binding. Wrap the binding around the edge. Baste. Edge stitch the binding. Trim the inside of the binding close to the stitching.

There is a small opening on each end of the neck binding where it folds in on itself. Insert a hook into the left opening and an eye into the other. Take a few stitches by hand to sew the hook and eye to the binding. With the hook and eye sitting inside the binding, the metal closure does not dig into your neck when worn.


Sleeves
Prepare the sleeve by lapping the underarm seam and attaching the sleeve hem binding to the lower edge. Hand baste the stitching line along the upper edge of the sleeve.


Remove the seam allowance from the armsyce of the garment. Pin the sleeve into the armsyce aligning notches. The cut edge of the garment will sit on the line of hand basting. Edge stitch and top stitch.

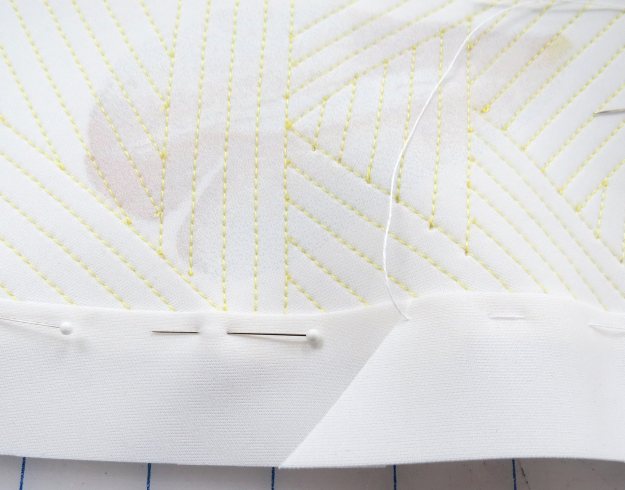
Quilted Hem Band
Prepare the Hem Band for quilting by lapping seams to make one continuous long band. Baste the two layers of the Band together along the upper and lower edges. Thread trace the side seam markings.

Using the 1/4” foot as a guide randomly stitch rows of quilting at different angles covering the entire Band. I used the securing stitch feature on my machine, which anchors the stitch at the beginning and end of each row with a knot. If I was ending along the bottom edge of the Band, which is finished with binding, I didn’t bother knotting off the threads.
The process of quilting the Hem Band does take some time to do but it is fun and definitely becomes a feature of the dress. The quilting stiffens the Hem Band, giving it some weight and helping the hemline to stand away from the dress.

To make binding for the bottom of the dress, I cut strips of fabric 1 1/4” wide. Pin binding to lower edge of Hem Band.

When strips have to be pieced, cut the overlapping strip at a 45 degree angle and lap it over the under layer. Baste the binding to the bottom edge of the Hem Band. Wrap the binding around the edge, baste through all layers. Edge stitch. Trim the back of the binding close to the stitching.
Overlap the dress onto the prepared Hem Band. Baste. Edge stitch and top stitch.

Ties
The ties for the dress were made from two layers of fabric. Remove all seam allowances from the ties and baste the two layers together.
Pin the ties to the waistband stopping 3” back from either side of the zipper. Edge stitch the loose ends of the ties.

Edge stitch the ties to the waistband.

Having stopped the edge stitching of the ties to the waistband 3” back on either side of the zipper allows them to be tied in a bow at the back of the dress.


Hi Kathryn! I really love this post! I have recently discovered scuba fabric and am getting ready for my first project, the top from the Camber Set by Merchant & Mills, before I attempt a dress with lots of parts and details. Here is my question: Have you tried sewing scuba on an overlocker? If so, how did it go and what needle did you use? My overlocker is a Janome 8002D.
LikeLike
Hi Christine, This is Linda from emmaonesock.com. I’ll try to get Kathryn to reply! It’s quite easy to sew with scuba on an overlock machine. I would recommend a three-thread overlock so the seam doesn’t get too bulky, and you can topstitch the seam down to keep it flat. I don’t know about a needle recommendation, so hopefully Kathryn will chime in with her thoughts.
LikeLike
From Kathryn: Scuba is a springy fabric so you want to use a technique to try and keep it flat. Although you could sew it on an overlocker it will not help the seams to lay flat. A cover stitch machine would work well and allow you to do flat lapped seam construction. As it is a knit fabric and does not ravel or fray there is no need to finish the seams with overlocking.
I would suggest sewing it on a sewing machine and trying lapped seam construction techniques.
LikeLike
Great tutorial! I am working on a scuba dress for my grandchildren. The knit is 1.5mm thick. Can I still use this for binding? And you pin it 3/8 inch from the edge after you trim off the seam allowance? In another place, you say to pin it to the neck edge. Please clarify for me. Thank you!
LikeLike
I’ll try to grab Kathryn to reply to your questions.
LikeLike
From Kathryn: Yes, your scuba will work well as a binding. Cut the binding wider than it needs to be as it will be trimmed back later. Remove the seam allowance from the edge to be bound. A 3/8” finished binding will shape around curves such as a neckline well. Pin one raw edge of the binding 3/8” in from the cut edge of the garment. Wrap the binding around the raw edge of the garment. Baste to hold. Edge stitch through all layers. Trim excess binding away close to stitching on the wrong side of the garment.
LikeLike
Does scuba absorb or repel water?
LikeLike
The fashion fabric “scuba” is not waterproof. It resembles the texture of the neoprene used for scuba gear, and that’s how it got its name, but is not the same thing. It is a fabric designed for ladies apparel, not for rainwear. Some scuba could be used for swimwear, but most swimwear is not water repellent either.
LikeLike
I love the detail using the overlapping seams. Amazing job on a great dress! My question, your zipper is invisible yet exposed. Would you use the same technique using a regular invisible zipper? I’d like to try this but can’t get my arm around the back seam (overlapping) and reg. Inv. zipper.
LikeLike
I will get Kathryn to reply to you, Becky!
LikeLike
Hi Becky, Here is Kathryn’s reply:
I think you are asking about using an invisible zipper in the traditional hidden form, correct?
If so, you will want to leave the seam allowance on the upper part of the seam.
Notch out the left hand side seam allowance, which will be the lapping seam at the bottom of the zipper and trim the seam allowance off of the lower portion of the seam.
The difference between the way I inserted the exposed zipper and what you want to do is, the seam allowance will remain on the upper portion of the seam while it is trimmed away from the lower portion of the left Back.
Lap and stitch the lower portion of the seam.
Insert the zipper into the seam allowance on the upper portion of the seam.
LikeLike
Thanks you Kathryn. I’ve chosen a pattern by New Look 8495. View A. I think all seams are suitable to lap. Do you agree? I do the waist darts like your bust darts. I’m looking at your layout…did your precut the dart for lapping? Did you use thread to mark darts? The upper leg of the dart …in the picture with the cutter you can see the V that looks like fabric has been removed and then you cut more. Is the more the upper leg?
I really appreicate your helping me with this. I know I’m a pain, but I want this dress to be done correctly. I’ve never done lapping and it is so pretty. I just love the detail.
Last question..How do I lap the waist seam? What over what?
You can blame this on Linda. She sold me my beautiful scuba knit. Well, and you, too! Your work is perfection!
Becky
LikeLike
EXPERT! love it.
LikeLike
Where did you get the fabulous zipper???
LikeLike
Thank you so much for the article and great tips. Glad I took time to read the post. Beautiful dress, floral pattern….looks great on you!
LikeLike
Beautiful work, and excellent details about working with scuba. I have a couple of pieces of scuba, and now I’m far more prepared to tackle them
LikeLike
Huge Thanks to you both, Linda and Kathryn. Another really terrific tutorial from Kathryn, so inspiring and it’s good and really helpful to see how to work with scuba. I will be making this Ralph Rucci dress in suba the future, but the colouring of the Carolina Herrera fabric is not for me
LikeLike
Wow! Great tutorial and a fabulous dress. Thanks so much for all the detail on how to sew scuba/neoprene fabric.
LikeLike
This was an excellent post! I love the deat ails and the craftsmanship
LikeLike
outstanding both in creativity and workmanship .
LikeLike
Thanks Kathryn – so beautifully constructed – very inspiring!
LikeLike
Wow Kathryn. I love your incorporation of quilting in the construction. It provided even more depth to an already beautiful design. Thank you for all the details provided. I notice that you basted throughout instead of relying on pins. I was surprised that you can steam press this fabric!
LikeLike