A Ruffle Wrap and Other Ruffle Techniques
by Kathryn Brenne
To see a list of all sewing tutorials, click here!
Spring always seems to bring pretty, feminine styles and this season is no exception with ruffles trending from runway to ready-to-wear . On a recent trip to London I was looking forward to spring weather and needed a garment to take the chill out of the evening air. I planned to wear Vogue 9168, my bias cut dress and slip pattern, in a floral print, and wanted something to coordinate with the red belt buckle and red shoes I planned to wear. Emmaonesock’s soft and drapey sweater knit #58161 in deep red was the perfect choice. I designed this shawl/wrap with ruffled edges to wear to the Royal Opera House in London. The beautiful red color coordinated perfectly with the sumptuous interior of the Opera House and was the perfect accessory for my outfit.

Fabric
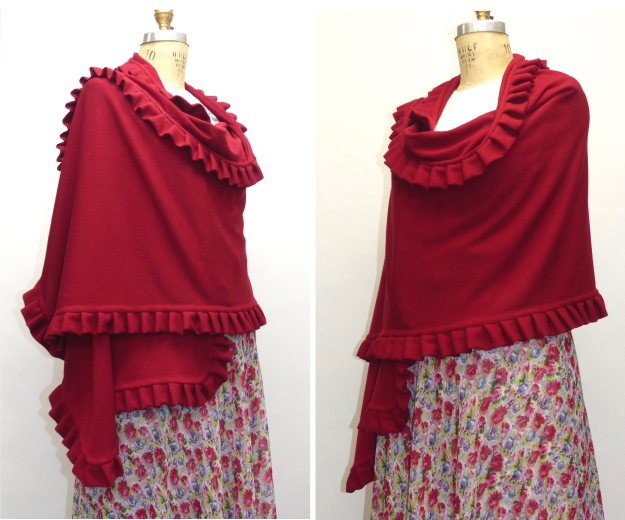
I was looking for a soft knit that resembled something you might find in ready to wear. Since a wrap is visible from both sides, it was also important that the wrong side of the fabric be attractive as well. Knitted on a fine gauge, #58161 doesn’t look noticeably different on the wrong side of the fabric. The knit has enough body and weight to offer warmth and stay in place when worn. I purchased 2 yards, which was enough for a wrap that measured approximately 72” in length by 24” in width; enough to wrap around myself to keep warm or drape comfortably across my back and over my arms.
I steamed the fabric to preshrink it.
Design

The wrap is rectangular in shape with rounded corners. Ruffles on ready to wear wraps are often knit in a rib pattern to coordinate with the body of the wrap. Instead of a single layer ruffle, which would have been a bit floppy, I folded the ruffle in half lengthwise and pleated it. This gave the ruffle more body, similar to a rib knit finish. It also solved the problem of having to finish an outer edge as the fold became the edge. The ruffle was sewn to the right side of the fabric. A binding made from self fabric finished the seam. It was pressed and sewn towards the wrong side of the fabric. This gave it a raised, rolled finish, similar to a rib finish found in ready to wear. This technique allowed the reverse side to look finished — not like the ‘wrong’ side of a garment.
Layout and Cutting
I laid out the fabric as a single layer on my cutting table. Using a rotary cutter and long metal yard stick, I removed the selvedge from one edge and squared up the ends. I cut the wrap 21” wide. Using a metal pocket template as a guide, I rounded the square corners.

I folded the wrap in half lengthwise to find the center and marked this with a thread tack. From the remaining fabric I cut six strips 3 3/4” wide to make the ruffle. I cut three strips 1 1/4” wide to make the binding. These strips were cut on the lengthwise grain.
Rather than trying to work out a ratio of how long to make the ruffle I tested out fullness on a sample. To do this, cut a 10” strip of fabric. Prepare a length of ruffle and baste the raw edges together.
Try pinning pleats in place until you are happy with the distance between the pleats and the amount of fullness folded into each pleat. Continue to pleat a length of the ruffle and pin it to the 10” sample.
Hold up the sample and make adjustments until you are happy with the pleating.
Then measure the length of ruffle sample, the perimeter of your shawl, and figure out the ratio from there.
Example: The outside perimeter of my shawl measured approximately 192”. Once I knew how much fabric it took to create a ruffle for a 10” piece of fabric I could multiply that amount by 20 and be assured that I would have enough ruffle to go all the way around my shawl.
Technique
1. Join the six ruffle strips together with 1/4” seam allowances. Press the seams flat and
then open.
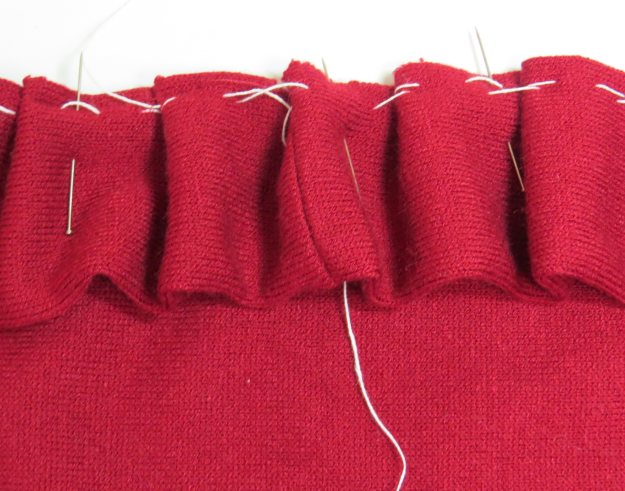
2. Fold the ruffle strip in half wrong sides together. Do not press to preserve the softness of the ruffle. Pressing would give a hard edge to the ruffle. Hand baste the raw edges together approximately 1/4” in from the edge.
3. Mark 1 1/8” intervals with chalk along the raw edge of the ruffle trim.

4. Pleat the ruffle by folding one of the chalk marks and bringing it over to meet the next chalk mark. Pin all of the pleats in place.


Machine baste 1/4” in from the edge using a stitch length of 4.5 mm.

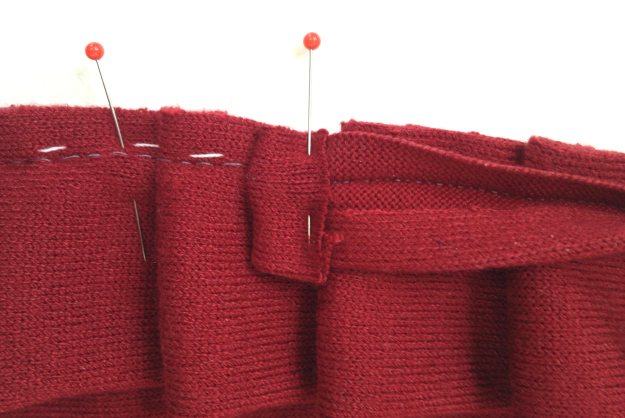
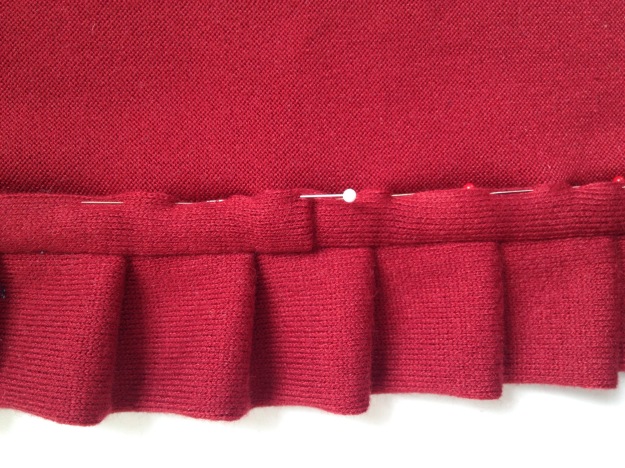
5. Beginning at the center marking on the side of the wrap, pin the ruffle to the wrap right sides together. It is useful to leave a tail of a few inches at the beginning. Ease the ruffle in a bit around the curved corners.

Once you come around to the beginning again, try and align the pleats into the same spacing and pattern as the beginning of the ruffle. Mark where the ruffle needs to be joined with a couple of pins.

6. Unpin a bit of the ruffle from the wrap to make it easier to seam the ends together. Unpick some of the basting and seam the two ends together with a 1/4” seam allowance. Press the seam allowance flat and then open. Baste the pleats back in place. Pin the seamed join to the wrap.
7. Seam the three binding pieces together with 1/4” seam allowances. Press the seams open.

Press under 3/8” on one long edge of the binding.

8. Leaving a tail of the binding free and starting an inch away from the center, pin the binding to the pinned layers.

Sew the binding to the pinned layers with a 3/8” seam allowance.

As you approach the center marking , fold the beginning tail back on itself and overlap the end tail.

9. Press the seam allowance towards the wrong side of the wrap.
10. Roll the binding over the seam allowance. Steam, don’t press the binding. Pin, then baste the folded edge to the wrap. Smooth the binding around the curves.
11. Slip stitch the folded edge of the binding to the wrap to finish. Take a few stitches in the folded join where the two ends met.


Other types of Ruffles

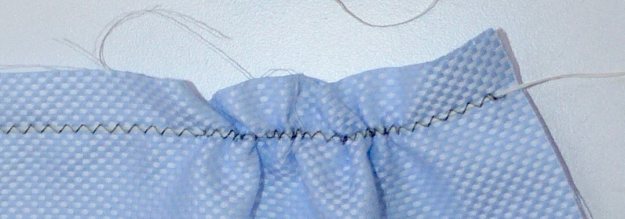
The wrap I made used pleats to create a ruffle, but ruffles can be created in other ways as well. Rather than pleating fabric, ruffles can be created by gathering strips of fabric. When gathering up long lengths of fabric it can be difficult to pull up the gathers afterwards. Rather than sewing two rows of gathers 1/4” apart using a long stitch length, try zigzagging over a length of dental floss. Use a width of 2.5 to 3 mm and center the dental floss in the middle of the foot. Pull up the dental floss to create gathers and ruffles.

Fullness can be created by cutting ruffles as circles. The inside diameter of the circle equals the edge to which it will be sewn. The outer edge of the circle is much longer and will create a ruffle. Portions of the circle will be on the bias giving this type of ruffle a nice drape and softness.

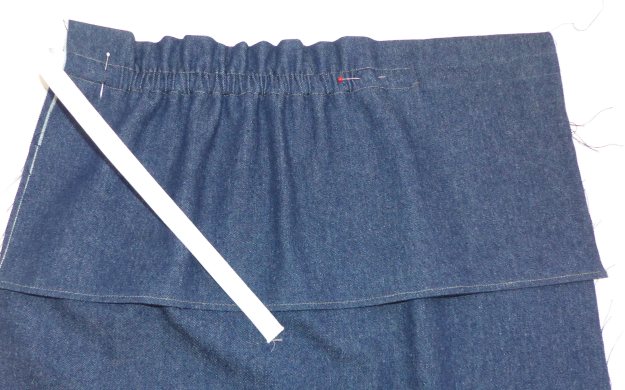
Another popular technique this season is to create ruffles with an elastic casing. In the photo below the RTW top has sleeves that have been cut with extra length and width. A casing is sewn to the wrong side of the fabric and elastic is threaded through. Once the elastic is pulled tight, the fabric will gather up creating a ruffled cuff.

Off the shoulder blouses are popular this spring. This top from current/elliott can be created by seaming a wide piece of fabric to the upper edge of the top. The ruffle folds down and a casing is stitched. Once elastic is threaded through the casing a ruffle will be created.


Kathryn, I’m so grateful to both you and Linda for not only this tutorial, but for ALL that you share. You are an exceptional artist with a unique capacity to share complex techniques in the most simplistic manner. By the way, you looked lovely in your delightful dress with the pretty red ruffle wrap!
LikeLiked by 1 person
I just Checked out your site after I saw your add in Threads magazine, and I am in love.
LikeLike
Katherine,
I recently made a polished cotton dress with a pleated ruffle at hem and pleated pockets with a ruffle at the top. I used a dinner fork to make each pleat the same size. It worked so well that I plan to use it to make some additional items with pleated ruffles!
LikeLiked by 1 person
What a beautiful wrap – thanks so much for the in-depth instructions. I hope you enjoyed the opera!
LikeLike
thank you for sharing your beautiful work
LikeLike
Never thought of using dental floss. Thanks!
LikeLiked by 1 person