Silk Velvet Luxury
by Kathryn Brenne
To see a list of all sewing tutorials, click here!
 Silk velvet has a wonderful hand and drape. Previously thought of as an eveningwear fabric, velvet is now used by designers in daytime wear as well. It is perfect for soft trousers, drapey jackets, skirts, tunic tops, bias cut slip dresses and accessories. With its reputation for being slippery and difficult to handle, sew and press, velvet sends some home sewists running in the opposite direction! But here we will explore a few techniques to help you control this luxurious fabric. Additionally, you’ll learn how to use one of the perceived negative qualities of velvet–its ability to crush easily or mar when pressed–to create unique garment details and textures.
Pattern


For this tutorial I chose Vogue v9153 view B, a tunic top pattern, to create a soft jacket with an asymmetrical hem. I made some alterations to the pattern and construction techniques which work better for the velvet:
1. I joined the Front Facing to the Front along the stitching line. This eliminated a seam down the front edge of the garment.
2. I drew on all stitching lines and hem fold lines. The garment was thread traced leaving very wide seam allowances around all pieces. This was helpful when joining the slippery seams together.
3. The Collar was cut on the bias.
4. A hem allowance of 2” was added to the Fronts and Lower Right Front. A 2” wide hem
allowance was drafted and cut as a separate pattern piece for the Back. A separate hem
facing was the easiest way to handle the curved shaping of the Back.
5. The pleat in the hem of the Sleeve was omitted.
6. The garment was lined. I used the same pattern pieces to cut the lining.
7. Interfacing was omitted. Instead the garment was backed with silk organza, which added body to the soft velvet and allowed me to invisibly hem the garment without any stitches showing through on the garment.
8. The buttonholes were converted to covered snaps and fabric covered buttons.
Fabric
 I purchased 3 yards of velvet in color heliotrope, 3.5 yards of silk organza in color 196 and 3.5 yards of silk habotai in color 157. The silk organza was used to back the velvet and the silk habotai, a nice lightweight silk, was perfect for the lining, since the jacket has an easy, loose fit. The silk habotai helps the garment to stay in place when worn whereas a smooth, slippery silk lining such as charmeuse would have allowed the garment to shift around too much. I also used a French Collar Canvas from my stash to support the collar.

Velvet can be crushed very easily. Care must be taken when pressing. To preshrink the fabric and remove any wrinkles from shipping, I carefully pinned the edge of the fabric to my shower rod. Using a garment steamer I carefully steamed the wrong side of
the fabric, holding the steamer a few inches away. I allowed the fabric to hang to dry and then pinned the opposite end to the rod to finish steaming the other end. Test this
technique on a corner first to ensure that you do not leave any marks or streaks on the right side of the fabric. If you do not have a fabric steamer, alternatively you could try steaming the fabric with steam from an electric kettle. Be careful that water does not land on the fabric.
To preshrink the organza and silk lining I steam pressed the fabrics.
French Collar Canvas is very stiff. To soften it I washed a strip of it with towels and dried in the dryer. Some sizing will remain. When it is just damp, press flat to finish drying. Be careful not to distort the grain, which is easily visible, when pressing.
Notions
–A size 70 Universal sewing machine needle, suitable for all fabrics.
–A size 9 long darner for thread tracing.
–Cotton basting thread for thread tracing and basting seams. (Two colors: white for thread tracing and yellow to baste the garment seams together.)
–100% kimono silk thread 100 weight for stab stitching.
–Gutermann 100% polyester all purpose thread for machine sewing.
–A walking foot to help the fabric feed evenly when machine stitching.
–4 x 1 1/4” metal covered button forms
–4 x 15mm black metal snaps
Layout, Cutting and Preparation
Velvet has a nap. Brush your hand over the fabric. It will feel smooth in one direction and rough in the other. The garment will appear darker and richer with the nap running upward and shiny with the nap running downward. I chose to lay out the pattern pieces with the nap running up.
Velvet must be cut as a single layer with the wrong side facing up. Lay out the pattern pieces with all of them running in the same direction and leaving large spaces
between each pattern piece. Note: Be sure to layout pattern pieces with the wrong side of the tissue paper facing up; otherwise the asymmetrical garment will be cut in reverse as the fabric has been laid out wrong side up.
It is helpful to leave a selvedge edge near all main pattern pieces. This easily shows the grain line, which is useful later when the sections are underlined.
1. Pin the tissue paper in place placing pins approximately 4” apart just to hold the pattern in place. Pins can leave marks in the velvet so be careful not to extend the tip of the pin beyond the stitching line.
2. Rough cut around the pattern pieces leaving a generous one to two inches beyond the
tissue paper pattern. As mentioned, try to keep the selvedge along one edge if possible. Do not forget to allow a generous 2” hem allowance beyond the hem fold line.
 3. Working from the wrong side of the fabric place pins directly along the stitching lines leaving about 1 1/2” between each pin. Place pins at 90º to the stitching lines when marking circles and notches. Place a row of pins along the new center front fold line and hem lines. The right Front and Back dart can be pinned along the stitching line.
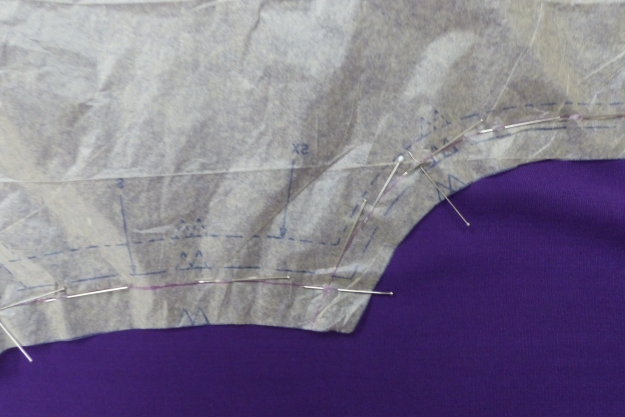 4. Turn the sections over. The pins, which were placed along the stitching and hem fold lines will outline the garment pieces. Using a long darner and white cotton basting thread, thread trace the garment with the tissue paper pattern still in place. Pick up a few stitches at a time using a running stitch to go from pin to pin. Once the thread tracing is complete, the garment has been outlined on the right side of the fabric. Remove the tissue paper pattern.

To cut the silk organza underlining, lay the silk organza out in a single layer. Lay the rough cut garment sections on top of the silk organza. If you were able to keep a selvedge when rough cutting the garment sections, this can now be used to align the grainline of the velvet with the grainline of the organza. If you do not have a selvedge, use the
tissue paper pattern as a guideline by laying it over the velvet to align the grain lines.

1. Pin the velvet to the organza being careful not to pin beyond the stitching lines or the hem fold line. Pin the dart in place along the stitching line. Pin center Front.
2. Rough cut the organza around the velvet sections.
3. Working with the velvet facing up, use fine kimono silk thread to stab stitch the velvet to the organza along the stitching lines, hem line, center Front and darts. Click here for stab stitch instructions. Stitches will disappear into the pile of the fabric on the right side but will hold the two layers of fabric together. The velvet is now underlined and can be treated as one layer.
Stay Tape
The Front and Back neck edges, Front shoulder and Center Front fold lines are all stayed with a tape, and the selvedges of the silk lining work perfectly for this use since it is a thin and tightly woven fabric. Cut strips 1/2″ wide from your silk habotai lining fabric.

Place the woven edge of the tape in towards the body of the garment and the cut edge facing out. Center the stay tape over the thread tracing and stab stitching. Pin to hold.
Working from the right side of the velvet, stab stitch the stay tapes in place. Position the stab stitching just to the outside of the thread tracing, inside the seam allowances. The Front fold line, neck and shoulder as well as the Back neck should all be stay taped.


Pressing Tips

Extreme caution must be exercised when pressing velvet. It can be marked so easily and once marked, it cannot be removed. Practice pressing on scraps first. I covered my ironing board with a length of velveteen to protect the pile of the velvet. I experimented with a needle board but was not happy with the results. Needle boards tend to be small. Mine is 4” x 10”. Although I was careful, when testing a sample seam, the finished corners of the needle board ended up leaving an impression in the velvet. I also experimented with a Velva Board. Although the Velva Board did not crush the pile, it did leave spotty marks on the velvet.
In the end I found it best to cover any pressing aids such as my ham and seam roll with scraps of the velvet, positioning the section to be pressed over the scrap and lightly steaming, holding the iron a good 10” back from the fabric. Be sure to practice this technique as a shot of steam directly on or too close to the velvet can permanently mark the fabric. With a bit of moisture from the steam in the fabric, I used my fingers to gently finger press the seams.
Embossing

I decided to try my hand at embossing velvet. Test this technique out on a sample first before beginning on yardage.
 I used a wood and rubber stamp block, which I purchased at a local craft store. My stamp was 5 3/4” x 4 1/2” by HERO ARTS® RUBBER STAMP and called FABULOUS FLOURISH.
Lay the stamp with the rubber facing up on your ironing board. Place the velvet face down over the stamp. Lightly mist the back of the velvet with water. Place the iron directly down over the velvet and rubber stamp. Do not move the iron around. It needs to sit on top of the velvet until the velvet is dry, which took approximately 18 seconds. Lift the velvet up. You will be left with the design embossed into the velvet.
I worked out a motif repeat where I flipped the stamp to mirror image the design across a row. I then did subsequent rows on top of the previous row but staggered the repeat by half of a design.
The Lower Right Front panel and Collar were cut from embossed velvet. Embossed scraps were used to cover the buttons. I chose a section of the stamp that I wanted to use for the buttons and
used only that portion for embossing the button scraps.
The embossing is semi-permanent. If steam is applied to the embossing the crushed nap, which created the embossed design, will lift and become a little less crisp.
General Construction
 I followed the pattern guide instructions for most of the general construction. I omitted any directions that created the tie and gathering on the right Front. The velvet was too bulky to pull up nicely and after playing with the garment I decided to omit the tie, which gave me several options for positioning the Lower Right Front when I wore the garment.
Darts
The darts were sewn in the Front and Back before the side seam was joined together. Leave long thread tails and pull them through to the wrong side to knot off.

Place the dart over a ham, which has been covered with a scrap of velvet. Steam and finger press the dart toward the hem.

Use an awl or the tip of a seam ripper to coax the nap of the pile out of the stitching.

Seams
Seams were basted together to prevent them from shifting. I engaged the dual feed foot on my Bernina sewing machine but a walking foot would also work as well when stitching the seams together. Use a stitch length of 2.5mm to sew the seams.
Lightly steam seams open and finger press using techniques described above.
Chalk a 5/8” seam allowance onto the velvet and use pinking shears to trim away excess
fabric. Both the velvet and the underlining silk organza are trimmed at the same time.

Collar
The Collar technique I used is one I learned from British couturier Jon Moore. It is a traditional couture Collar technique and works extremely well in velvet.
1. Trace out the Under Collar with no seam allowances on a piece of bias cut collar canvas. Rough cut the collar canvas with approximately 3/4” seam allowance around all sides.
2. Place the bias cut collar canvas onto the thread traced Under Collar, which has also been cut on the bias. Baste around the three outer edges and pin the neck edge.


3. Pad stitch the Under Collar beginning at the outer edge working your way towards the neck edge. Move pins if necessary to build roll into the collar. The pad stitching will be hidden in the nap of the velvet on the Under Collar.

4. Press the collar canvas and Under Collar flat. Don’t worry, shape has been built into the collar with the pad stitching! Do not use steam as it may affect the embossing.

5. Pin the original pattern back onto the prepared Under Collar redrawing any pencil lines, which have shifted.

6. Trim the outer 3 edges of the Under Collar along the pencil line. This should be a smooth, even and neat cut as it will become the edge that shapes the Upper Collar. These 3 outer edges have no seam allowance and are cut on the stitching line.

7. Lay the prepared Under Collar onto a piece of bias cut fabric, which will be used for the Upper Collar. Wrap the Upper Collar over the outer edge of the Under Collar. Baste in place.

8. Chalk an even 1/2” along the outer edge of the Collar. Trim excess fabric away.

9. Catch stitch over the cut outer edge of the Upper Collar sewing it to the Under Collar.
10. Clip a small V out of the corners of the Upper Collar to reduce bulk.

11. Fold the outer edge of the Upper Collar down on a slight angle.

12. Fold the edges of the Upper Collar over the Under Collar and pin. Baste. Trim to an even 1/2” and catch stitch to under Under Collar.


Using this technique the Upper Collar will have perfectly sharp corners.

Finished Under Collar with catch stitching
11. Wrap finished Collar around a ham, pin and leave to set until ready to insert into the
garment.

Attaching the Collar to the Garment
Fold the new Front Facing, which was cut as one with the Front of the garment back on itself along the foldline. Stitch an “L” from the folded edge to center front and then up at a 90º angle.

Clip into the corner of the L, which will allow you to turn it right side out.
Attach the prepared Collar to the neck edge of the prepared garment. The edges of the Collar will fit into the sewn L at center front. I hand stitched the Collar to the garment but this step can be machine sewn if you wish. Bring the Facing up over the edge of the Collar and slip stitch in place.

Sleeves
I like to set my sleeves by hand. To begin I run two rows of basting around the sleeve cap and pull them up slightly.

Pin the sleeve into the armsyce, working on a dress form. On the velvet I used very sharp, fine pins so that they would not mark the velvet. Watch to see that the sleeve is hanging properly. Rotate the notch at the top of the sleeve slightly if needed to make the sleeve hang straight. If the seam at the underarm does not match up perfectly with the garment, this is not critical. It is more important that the sleeve hang properly.

Baste the sleeve in place. Backstitch the sleeve to the garment.
Shoulder Pads and Sleeve Heads

A small shoulder pad and sleeve head were inserted into the garment. Reference this article to see how the shoulder pad was basted to the shoulder seam allowances. I made a small sleeve head from an oval shaped piece of lambswool. Alternatively Warm and Natural quilt batting could work.
Hems
For the Back hem, I chose to cut a Hem Facing out of velvet. The Hem Facing was backed to silk organza, basted to the lower edge of the Back before the side seams were sewn.
Once the side seams were sewn, the hem was turned up and pinned in place from the outside of the garment.

Working on a dress stand adjust the hem line as needed. I found that it was best to go with my eye because some of the marked hemlines appeared uneven on the asymmetrical hem line. Fold miters into the hem allowance of the front points.
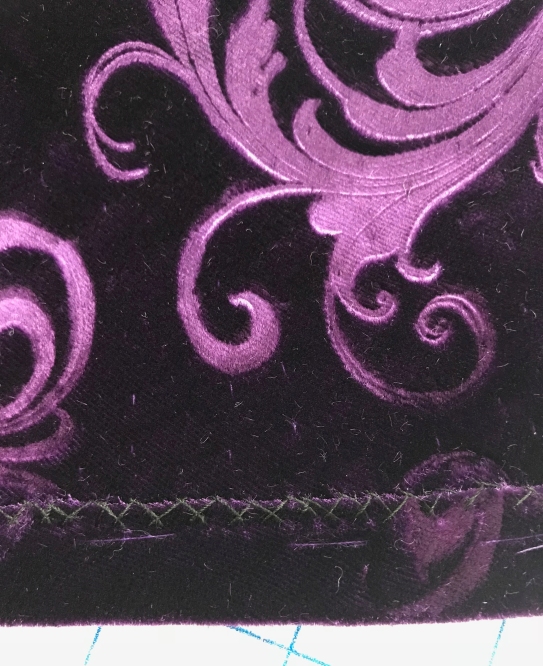
Trim hem allowance to an even 2” and pink the edge.
Hem stitch to the organza. By hem stitching to the organza there is no risk of stitches showing through to the right side of the velvet. Slip stitch the miters in place.
I omitted the tuck detail in the sleeve hem. Instead I turned up a 2” hem allowance and hem-stitched in place.

Closures
Closures on velvet can be tricky! For this jacket I used 1 1/4” metal button forms covered with embossed velvet. Behind the buttons I used snaps covered with silk lining.
I embossed small scraps of velvet to cut the circles to cover the metal button forms. I tried to place the same motif on each button so all of the buttons would match.
The male portion of the snap was sewn to the right Front Facing and the female side to the left Front.


Lining
As mentioned, I used silk Habotai for the lining. The garment has a loose, easy fit and I wanted a lining with a bit of grip to it. A charmeuse lining would have been too slippery.
Use the same pattern to cut and sew the lining together. Working on a dress stand with the garment turned inside out, use the technique outlined in this article to pin the lining in place and set it in by hand. Attach the lining to the hem allowance at the bottom of the garment with a catch stitch.
Other Techniques for Working with Velvet
I did not use these techniques for this project but have included them as they will be helpful when making other garments.
Under stitching
Because it is difficult to press velvet flat, under stitching can be used to hold edges in place. This technique could be used along a neckline or facing.

Sew seam, steam seam open and then finger press to one side.


Underside
Use a tiny prick stitch to hold seam allowances in place on the one side. A prick stitch is a tiny back stitch. Stitches should be placed approximately 3/16” apart.

Buttonholes
Cover the buttonhole area with a single layer of Aqua Film stabilizer.

Machine stitch a buttonhole through the Aqua Film and fabric.

Gently tear away the stabilizer.

Use a button hole chisel to cut open the buttonhole.

Scarf and Texture

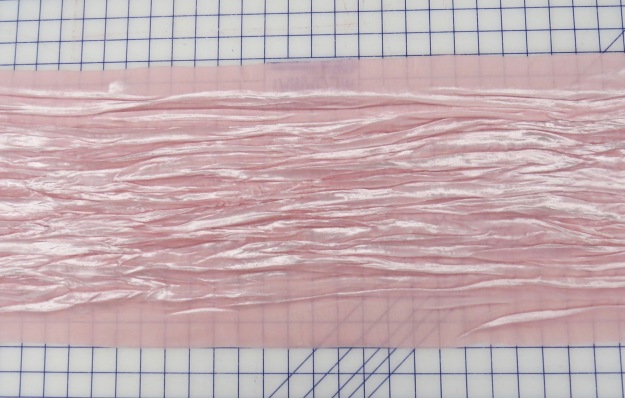
Using one of velvet’s potentially negative characteristics, it’s ability to crush easily, I created this crinkled, textured scarf from just 1/4 yard of velvet. The scarf is cut across the width of the fabric.
Working with the velvet nap side down against the ironing board, hand pleat the fabric. I left a few inches flat on either side for seaming.

Use the iron to press the pleats flat.

Pleats are very random and irregular.

Fold the fabric in half right sides together and pin. Baste.

Sew the seam using a walking foot. Leave an opening in the seam to turn the scarf right side out.


Center the seam down the middle of the scarf. Press the seam allowance open.

Baste across the end of the scarf, flattening out the previously pressed pleats. Stitch. Turn the scarf right side out through the opening in the long seam. Slip stitch the opening closed. Arrange the area around the seam into pleats and press flat. Pleat the ends of the scarf and press.

Finished!
Care and Cleaning
All of the fabrics used in this project require dry cleaning. Velvet is easily marked so I will wear this garment with care. It is best to avoid having to clean it for as long as possible by wearing something underneath, either a dress or camisole.

A brilliant article, a true inspiration and a great interpretation of one of my favourite patterns
LikeLiked by 1 person
What a lovely read as I drank my morning tea this morning. The jacket is wonderful and your instructions very clear. It reminds me of the type of time I would take with garments when I lived in England. Very satisfying. Thanks. Jane Foster
LikeLike
Purple Perfection! Lovely jacket! I appreciate your work.
LikeLiked by 1 person
The shirt is absolutely beautiful. I have a question: will the velvet stayed embossed after it is washed?
LikeLiked by 1 person
Hi Althea, She does address your question in the article in the section about the embossing, and then at the end of the article under care and cleaning… It’s best to avoid having to launder it. Definitely washing will take out the embossing so don’t attempt to hand or machine wash… It’s best to wear something under it if you try this embossing method. But dry clean only if you need to clean it.
LikeLike
Thanks so much for the advice
LikeLike
A fabulous article!
LikeLiked by 1 person
Thank you for this interpretation. You have made sense out of this design! I love all things purple and this jacket is fabulous!
LikeLiked by 1 person